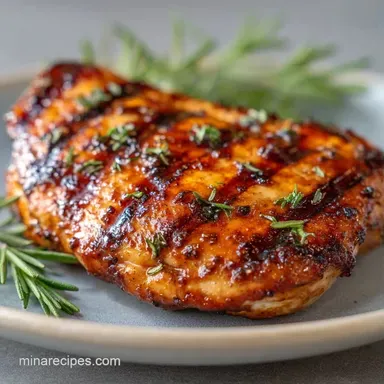
Seasoned Grilled Chicken Breast: Tender and Juicy

- Time: 10 min active + 30 min marinating + 12 min cooking
- Flavor/Texture Hook: Deep mahogany crust with a tender, velvety center
- Perfect for: Fast weeknight dinners or high protein meal prep
Seasoned Grilled Chicken Breast
That smell of charred lemon and smoked paprika hitting a hot grate is, for me, the official scent of an American summer. Growing up, the backyard grill wasn't just about food, it was the center of everything.
My dad spent hours obsessing over the flame, but for some reason, the chicken breasts always came out like dry erasers. It was a weird cultural paradox: we had the best grills, but we treated the leanest meat like a steak.
I spent years trying to figure out why my chicken felt like chewing on a gym shoe while the sides were perfectly charred. The problem wasn't the heat or the seasoning, it was the shape of the bird. A chicken breast is a teardrop, which means the thin end is overcooked by the time the thick part is safe to eat.
This Seasoned Grilled Chicken Breast fixes that by treating the meat with a bit of respect. We flatten it, season it aggressively, and use a short, punchy marinade. You get that classic charred exterior and a center that actually stays moist.
Why Most Recipes Fail
Most people just throw a whole breast on the grill and hope for the best. They see the outside turning brown and assume it is done, but they are ignoring the physics of the meat. Because the breast is uneven, you end up with a "dry zone" and a "danger zone" in the same piece of meat.
By the time the center hits 165°F, the edges are basically sawdust.
Another big mistake is over marinating. Some recipes tell you to soak chicken in lemon juice for 24 hours. Trust me, don't do that. Acid breaks down protein, but too much of it actually changes the texture from "tender" to "mushy." It ruins the bite of the meat.
Then there is the temperature issue. People often pull the meat off the grill the second the thermometer hits 165°F. They forget about carry over cooking. The heat trapped in the meat keeps working even after it leaves the fire, often pushing the temperature too far and drying out the Seasoned Grilled Chicken Breast just as you sit down to eat.
- Uniform Shape
- Pounding the meat ensures the heat penetrates evenly from edge to center.
- Acid Timing
- A 30 minute soak tenderizes the surface without destroying the protein structure.
- Thermal Rest
- Pulling at 160°F allows the meat to coast to 165°F without overshooting.
- Room Temp Start
- Taking the chill off the meat prevents the outside from burning before the inside cooks.
| Prep Style | Cook Time | Texture | Best For |
|---|---|---|---|
| Pounded (Fresh) | Fast/Even | Velvety & Juicy | high-quality dinner |
| Whole (Shortcut) | Slower/Uneven | Firm/Dry edges | Very rushed meals |
| Sliced (Tenders) | Ultra Fast | Soft | Quick salads |
Ingredient Deep Dive
The goal here is a balance of salt, acid, and smoke. We aren't trying to mask the chicken, but we want to create a crust that tastes like a professional steakhouse.
| Ingredient | Science Role | Pro Secret |
|---|---|---|
| Lemon Juice | Protein Denaturation | Use fresh lemons; bottled juice tastes metallic |
| Smoked Paprika | Color & Aroma | Adds a "wood fired" taste even on gas grills |
| Olive Oil | Heat Transfer | Prevents sticking and helps spices adhere |
| Sea Salt | Moisture Retention | Salt draws moisture out, then pulls seasoning in |
The salt is the most important part of your Seasoned Grilled Chicken Breast. It doesn't just add flavor, it changes how the protein holds onto water. Without enough salt, the juices just leak out onto the grill grates.
Essential Gear
You don't need a fancy setup, but a few specific tools make this a lot faster. I use a heavy meat mallet, but a rolling pin or even a heavy skillet works if you are in a pinch.
The most important tool is an instant read meat thermometer. Guessing the doneness of chicken is a gamble you will lose half the time. I use a digital probe because it gives me a reading in two seconds.
For the marinade, a zip top bag is way better than a bowl. It forces the liquid and spices into every nook and cranny of the meat, meaning you use less oil for the same amount of flavor.
Step-by-step Guide

Follow these steps exactly to ensure your Seasoned Grilled Chicken Breast stays juicy.
- Place the chicken breasts between two sheets of parchment paper. Use a meat mallet to pound the thicker end until the entire breast is a uniform 3/4 inch thickness. Note: This is the only way to avoid dry edges.
- In a small bowl, whisk together the olive oil, lemon juice, and minced garlic.
- Place the pounded chicken in a zip top bag, pour in the liquid marinade, and sprinkle the smoked paprika, garlic powder, onion powder, dried oregano, black pepper, and sea salt over the meat.
- Massage the bag to ensure the chicken is evenly coated and let it marinate for 30 minutes at room temperature. Note: Don't go longer than an hour or the lemon will make the meat mushy.
- Preheat the grill to medium high heat (approximately 400°F / 200°C) and lightly oil the grates.
- Place the chicken breasts on the grill. Sear for 5–7 minutes per side until a deep mahogany crust forms and the internal temperature hits 160°F (71°C).
- Transfer the chicken to a plate and tent loosely with foil.
- Let it rest for 5 minutes, allowing it to reach a final internal temperature of 165°F (74°C).
Pro Tips and Pitfalls
If you find that your Seasoned Grilled Chicken Breast is sticking to the grill, you probably didn't get the grates hot enough. Meat sticks when the proteins bond to the metal. Once a proper sear forms, the meat will actually release itself from the grill. If it's resisting, give it another minute.
Another tip is to avoid moving the meat. I see people flipping their chicken every two minutes. Stop that. You need constant contact with the heat to get those charred grill marks. Flip it once, and only once.
Chef's Note: If you have a very thick breast, don't be afraid to pound it thinner than you think. 3/4 inch is the sweet spot for speed and juiciness.
Why Meat Turns Dry
Overcooking is the obvious answer, but the root cause is often the temperature gap. If you put ice cold meat on a 400°F grill, the outside burns before the inside is safe. Let the meat sit out for 20 minutes first.
Avoiding Grill Stick
Oil your grates right before the meat hits the fire. Use a paper towel dipped in oil held by tongs to wipe the grates clean and lubricated.
Flavoring the Center
The marinade helps, but the pounding is what really lets the salt and spices penetrate. Without flattening the meat, the seasoning stays on the surface.
| Problem | Root Cause | Solution |
|---|---|---|
| Rubbery texture | Overcooked/No rest | Pull at 160°F and rest 5 mins |
| Pale color | Heat too low | Increase to 400°F (200°C) |
| Bitter taste | Burnt garlic | Ensure garlic is minced fine and mixed in oil |
Common Mistakes Checklist
- ✓ Pounded to uniform 3/4 inch thickness
- ✓ Marinated for 30 mins (not overnight)
- ✓ Grill preheated to 400°F (200°C)
- ✓ Pulled from heat at 160°F
- ✓ Rested under foil for 5 minutes
Custom Flavor Ideas
This base recipe is a blank canvas. If you want to switch things up, you can easily tweak the dry rub. For a kick, add a teaspoon of cayenne pepper or chipotle powder to make a Spicy Grilled Chicken Breast Recipe.
If you prefer something a bit sweeter, I highly recommend trying a Chicken Marinade with Honey recipe. Just be careful with honey on the grill, as sugar burns much faster than salt and oil. You might need to drop the heat slightly.
For a Mediterranean twist, swap the smoked paprika for dried rosemary and add a teaspoon of Dijon mustard to the liquid base. The mustard acts as an emulsifier, helping the oil and lemon juice stick to the meat even better.
If you are following a strict Keto or Paleo diet, this recipe already fits. Just ensure your sea salt is pure and your olive oil is extra virgin. You can replace the lemon juice with apple cider vinegar for a different tang that still keeps the meat tender.
Storage and Freshness
Once your Seasoned Grilled Chicken Breast has cooled, store it in an airtight container in the fridge. It stays great for 3 to 4 days. To keep it from drying out during storage, slice it into strips and store it with a tiny bit of olive oil or a splash of lemon juice.
For the freezer, wrap the cooked breasts tightly in foil and then place them in a freezer bag. They will last up to 3 months. When you are ready to eat, thaw them in the fridge overnight.
To reheat without turning the meat back into rubber, avoid the microwave if you can. Instead, heat a skillet over medium heat with a teaspoon of butter. Add the chicken and a tablespoon of water, then cover with a lid for 2-3 minutes. The steam re hydrates the fibers.
If you are planning ahead, this is a great base for a Chicken Breast Meal Prep recipe. Pair the sliced chicken with quinoa and roasted vegetables for a balanced lunch.
To reduce waste, save any leftover marinade in the bag only if you plan to boil it first. Otherwise, discard it. If you have leftover grilled chicken that is starting to lose its luster, chop it up and toss it into a spicy chicken salad or a quick quesadilla.
Serving Your Chicken
Presentation makes a difference in how the meal feels. Instead of serving the breast whole, let it rest and then slice it against the grain on a bias. This exposes the juicy interior and makes the Seasoned Grilled Chicken Breast look much more appetizing.
I love serving this on a platter with a handful of fresh parsley and a couple of charred lemon halves. Grill the lemon halves face down for 2 minutes until they are caramelized, then squeeze that warm juice over the meat right before eating.
For a full meal, pair the chicken with a crisp cucumber salad or some grilled asparagus. The acidity of the salad cuts through the richness of the olive oil and the smoke of the paprika, creating a balanced plate.
If you are serving a crowd, keep the chicken on a warm platter under foil. This ensures that everyone gets a piece that is still warm but hasn't overcooked from sitting on the grill. Simple, fast, and actually tastes like the summer.
Recipe FAQs
What seasoning to put on grilled chicken breast?
Use a blend of smoked paprika, garlic powder, onion powder, dried oregano, black pepper, and sea salt. Mix these with olive oil, lemon juice, and minced garlic to create a savory, aromatic crust.
Can I eat grilled chicken with diabetes?
Yes, grilled chicken is an excellent choice. It provides high-quality lean protein without adding refined sugars or processed carbohydrates.
Is grilled chicken good for heart patients?
Yes, this method is heart-healthy. Using olive oil and grilling instead of frying significantly reduces the intake of unhealthy saturated fats.
Can a diabetic eat marinated chicken?
Yes, as long as the marinade is sugar-free. This specific recipe relies on lemon juice and spices rather than honey or sugar, making it safe for diabetic diets.
How to make grilled chicken breasts more flavorful?
Marinate the meat for 30 minutes at room temperature. Pound the breasts to a uniform 3/4 inch thickness first so the seasoning penetrates evenly and the meat doesn't overcook.
What can be done with leftover grilled chicken breasts?
Slice the cooled breasts into strips for salads or wraps. These pair perfectly with garlic parmesan green beans for a quick, low-carb meal.
Is it true that grilled chicken breasts always turn out dry?
No, this is a common misconception. Pounding the meat to a uniform thickness and resting it until the internal temperature hits 165°F ensures the juices redistribute, keeping the meat moist.
Seasoned Grilled Chicken Breast: Tender