Pan Seared Chicken: Golden and Juicy
- Time: 5 min active + 10 min cook
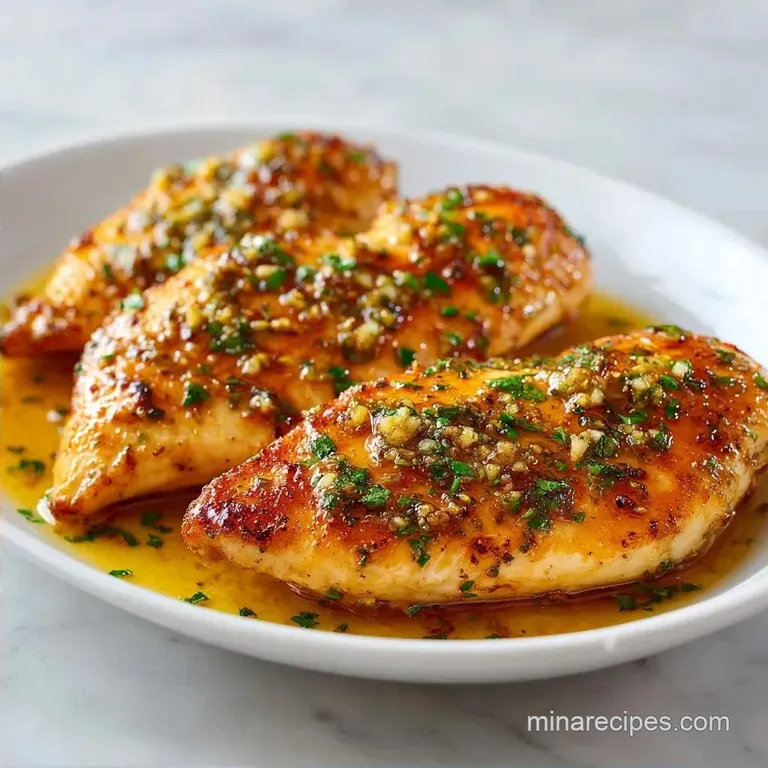
- Flavor/Texture Hook: Mahogany crust with a velvety butter finish
- Perfect for: A fast weeknight dinner that feels fancy
Listen, we've all been there. You drop a chicken breast into a hot pan, and it looks great for a second, but then it happens. The outside is charred black, but when you cut into the middle, it's practically raw.
Or worse, you overcook it to make sure it's safe, and suddenly you're chewing on something with the texture of a rubber eraser. It's the most frustrating part of cooking chicken.
The real problem is that chicken breasts aren't shaped like bricks. They're thick at one end and thin at the other, so they never cook evenly. I used to think I just needed a better pan, but the secret is actually in the prep. If you don't flatten the meat, you're fighting a losing battle against thermodynamics.
That's where this Pan Seared Chicken method comes in. I'm showing you how to fix the shape of the meat and use a technique called basting to keep things moist. You'll get that deep, brown crust and a center that's actually tender. Right then, let's crack on.
Pan Seared Chicken
The biggest mistake I see people make is rushing the sear. They move the chicken around too much, which just steams the meat instead of browning it. You have to be brave and leave it alone for a few minutes. Once that crust forms, the meat will actually release from the pan on its own.
If it's sticking, it's telling you it's not ready to flip. Trust the process.
Another thing is the heat. If your oil isn't shimmering, you're just frying the chicken in grease. You want that aggressive sizzle the moment the meat hits the surface. This is what creates the flavor.
When we add the butter and garlic at the end, we're not just adding fat, we're creating a flavor bath that coats every inch of the chicken.
The Secret to Juicy Meat
Since we're focusing on a few simple steps, it's helpful to understand why they actually matter. It's not about being a pro, it's just about how the food reacts to the heat.
- Surface Dryness: Any water on the skin turns into steam. Steam is the enemy of a crust. By patting the meat bone dry, the oil can brown the protein immediately.
- Uniform Thickness: Pounding the breast to 2cm ensures the thin tail doesn't turn into leather while the thick head is still raw.
- Fat Based Basting: Butter carries the flavor of garlic and thyme much better than oil. Spooning it over the meat finishes the cooking gently while adding a velvety texture.
- Carry Over Heat: Taking the meat off at 71°C allows the internal temp to rise to 74°C while resting, meaning you don't overcook it in the pan.
Fresh vs Shortcut Comparison
| Component | Fresh Method | Shortcut Method | Impact |
|---|---|---|---|
| Herbs | Fresh Thyme | Dried Thyme | Fresh is more aromatic; dried can be gritty |
| Prep | Hand pounding | store-bought Cutlets | Hand pounding allows for custom thickness |
| Acid | Fresh Lemon | Bottled Juice | Fresh has a brighter, cleaner zing |
The difference between these options is usually small, but if you're aiming for a restaurant style result, the fresh route is the way to go.
Recipe Quick Facts
Before we dive into the ingredients, here are a few precision checkpoints to keep in your head. These are the "non negotiables" for this recipe.
- Target Thickness: 2cm (3/4 inch)
- Pull Temperature: 71°C (160°F)
- Resting Time: 5 minutes
Decision Shortcut
- If you want more richness, use Easy pan seared chicken thighs.
- If you're in a massive rush, skip the basting and just sear.
- If you want a "date night" vibe, add a splash of cream at the end.
Ingredient Guide
I'm keeping this list simple because the technique does the heavy lifting here. Honestly, don't even bother with low-fat butter or lean oils that smoke too early.
- 4 boneless, skinless chicken breasts (approx. 680g) Why this? Standard size for consistent timing
- 1 tsp Kosher salt Why this? Coarser grains are easier to distribute
- ½ tsp Black pepper Why this? Freshly cracked is always better
- 2 tbsp high smoke point oil Why this? Prevents the oil from burning at high heat
- 3 tbsp unsalted butter Why this? Allows you to control the salt level
- 3 cloves garlic, smashed Why this? Smashed cloves infuse better than minced
- 1 tbsp fresh lemon juice Why this? Cuts through the richness of the butter
- 1 sprig fresh thyme Why this? Adds an earthy, woody aroma
Component Analysis
| Ingredient | Science Role | Pro Secret |
|---|---|---|
| High Smoke Oil | Heat Transfer | Use avocado or grapeseed oil to avoid a burnt taste |
| Unsalted Butter | Flavor Carrier | Add it late so the milk solids don't burn |
| Lemon Juice | Acid Balance | Add at the very end to keep the flavor bright |
If you don't have thyme, rosemary works just as well. Just don't use something too strong like sage, or it'll overpower the chicken.
Essential Kitchen Tools
You don't need a fancy kitchen, but a few specific tools make this Pan Seared Chicken way easier. If you use a thin non stick pan, you'll never get that mahogany crust.
First, you need a heavy bottomed skillet. Cast iron or stainless steel is best because they hold heat. When you drop the meat in, a thin pan will drop in temperature, and you'll end up steaming the meat.
Second, get a meat mallet or even a heavy rolling pin. You can't just guess the thickness. Use a ruler or your thumb to make sure it's about 2cm across the whole piece.
Finally, an instant read thermometer is your best friend. Stop guessing if the chicken is done by cutting into it, because that just lets all the juices leak out onto the board.
Step by step Method

Let's get into the actual cooking. Remember to stay focused on the sensory cues - the sounds and smells are your best guides.
- Prepare the meat. Pat the chicken breasts completely dry with paper towels. Place them between two sheets of plastic wrap and gently pound the thicker end until the breast is an even thickness of about 2cm. Note: This prevents the ends from drying out.
- Season. Sprinkle both sides of the chicken breasts generously with salt and pepper. Press the seasoning in with your fingers.
- Heat the pan. Pour the oil into your heavy skillet over medium high heat. Wait until the oil shimmers and starts to wisp smoke.
- The first sear. Carefully lay the chicken in the pan. Let it sear undisturbed for 5 minutes until a mahogany colored crust forms. Flip only once the meat releases naturally from the pan.
- Adjust heat. Reduce the stove to medium heat. This prevents the butter from burning.
- Add aromatics. Toss in the butter, smashed garlic, and thyme sprig.
- Baste the meat. As the butter foams, tilt the pan. Use a spoon to continuously pour the bubbling butter over the chicken for the final 2-3 minutes. Note: This keeps the meat velvety and moist.
- Check temp. Remove the chicken from the pan the moment the internal temperature reaches 71°C.
- The final rest. Transfer to a plate and let it rest for 5 minutes until it reaches a final temperature of 74°C.
Fixing Common Pan Issues
Even if you follow the steps, things can go sideways. Usually, it's just a matter of temperature or moisture.
Burnt Exterior Raw Interior
This happens when your pan is screaming hot but your chicken is too thick. The outside chars before the heat can reach the center. Make sure you pounded the meat to 2cm and lowered the heat slightly after the initial sear.
Meat Sticks to Pan
If the chicken won't budge, it's either because the pan wasn't hot enough when you started, or the meat was too wet. Be patient. The meat will "release" once the crust is properly formed.
Rubbery Texture
Rubbery chicken is almost always a result of overcooking. If you don't let the meat rest, the juices just run out, leaving the fibers tight and chewy. Always use a thermometer.
Troubleshooting Guide
| Problem | Root Cause | Solution |
|---|---|---|
| Chicken is grey/steamed | Pan was crowded or too cold | Cook in batches; wait for oil to shimmer |
| Butter is black/burnt | Heat was too high during basting | Lower to medium before adding butter |
| Meat is dry/stringy | Overcooked past 74°C | Pull at 71°C and let carry over heat finish it |
Common Mistakes Checklist
- ✓ Did I pat the chicken completely dry?
- ✓ Is the thickness uniform (approx 2cm)?
- ✓ Did I wait for the oil to shimmer before adding meat?
- ✓ Did I leave the chicken undisturbed for 5 minutes?
- ✓ Did I let the meat rest for 5 full minutes?
Flavor Variations
Once you've got the basic Pan Seared Chicken down, you can really play with the flavors. The butter basting stage is where the magic happens.
For a Pan seared chicken breast with lemon butter sauce, just double the lemon juice and add a pinch of parsley at the end. It's bright, zesty, and feels like a summer meal. If you're craving something richer, a Pan seared chicken breast with cream sauce is the way to go. Just whisk in 60ml of heavy cream and a handful of parmesan into the pan drippings after you remove the meat.
If you're tired of breasts, Easy pan seared chicken thighs are a great swap. They have more fat, so they're harder to overcook and have a deeper flavor. You can even try Pan seared chicken bites by cutting the breast into 3cm chunks and searing them for only 2-3 minutes per side.
If you're looking for something even faster, my Garlic Butter Chicken is a great alternative that uses a similar flavor profile but a slightly different approach.
Storage and Waste
If you have leftovers, don't just throw them in a plastic container. Store the chicken in an airtight container in the fridge for up to 3-4 days. For the freezer, you can keep it for about 2 months, but the texture might change slightly.
To reheat, avoid the microwave if you can. It'll turn your juicy chicken into rubber. Instead, put it in a pan with a tiny bit of butter over low heat just to warm it through.
As for zero waste, don't you dare wash that pan immediately. The brown bits stuck to the bottom are called fond, and they are pure flavor. You can deglaze the pan with a splash of white wine or chicken broth to make a quick pan sauce for vegetables.
Scaling Guidelines
- Scaling Down (1-2 servings): Use a smaller skillet so the butter doesn't spread too thin and burn. Reduce the cooking time by about 20% since there's less mass in the pan.
- Scaling Up (8+ servings): Never crowd the pan. If you put 8 breasts in one skillet, the temperature will plummet and you'll steam the meat. Work in batches of 3 or 4.
- Spices: When doubling the recipe, only increase salt and pepper to 1.5x. Too much salt can draw moisture out of the meat during the sear.
Best Pairing Ideas
Since this Pan Seared Chicken is so rich and buttery, you need something to cut through that fat. A crisp green salad with a vinaigrette or some roasted asparagus works beautifully.
For a more comforting meal, serve this with some homemade garlic bread to soak up the leftover lemon butter from the plate. A side of fluffy mashed potatoes or a light quinoa pilaf also keeps the meal balanced.
If you're serving this for a family dinner, I recommend placing the chicken on a large platter surrounded by sautéed spinach. It looks professional but takes almost no extra effort. Just remember to pour any remaining butter from the pan over the meat right before serving to give it that final glossy look.
High in Sodium
820 mg 820 mg of sodium per serving (36% 36% of daily value)
The American Heart Association recommends a daily sodium limit of 2,300 mg for most adults to maintain heart health.
Tips to Reduce Sodium
-
Reduce Kosher Salt-25%
Cut the Kosher salt in half or eliminate it entirely, as it is the primary source of sodium in this recipe.
-
Use Low-Sodium Seasoning-20%
Replace the salt with a low-sodium seasoning blend or a potassium based salt substitute to maintain flavor.
-
Add Fresh Citrus-15%
Squeeze fresh lemon juice over the chicken before serving to provide a bright acidity that mimics the taste of salt.
-
Maximize Searing-5%
Allow the chicken to develop a deep golden brown crust in the pan to create natural savory flavors through the Maillard reaction.
-
Enhance Aromatics
Double the amount of smashed garlic and fresh thyme to increase the complexity of the dish without adding sodium.
Recipe FAQs
How to cook pan seared chicken breast?
Pound to even thickness, sear for 5 minutes per side, and butter baste. Start by patting the meat dry and pounding to 3/4 inch. Sear in high smoke point oil over medium high heat, then finish by spooning foaming butter, garlic, and thyme over the chicken.
What is the best way to pan sear chicken?
Pat the chicken completely dry before seasoning. Moisture creates steam, which prevents the mahogany colored crust from forming. Pounding the meat to an even thickness also ensures the edges don't dry out before the center is cooked.
How to cook chicken for someone with gastritis?
Avoid the garlic and lemon juice. Stick to mild seasoning and gentler heat to prevent irritation. For a non-seared alternative, try our tender baked chicken recipe.
How to cook chicken for diabetic patients?
Focus on lean proteins and avoid added sugars. Use the pan-searing method with salt, pepper, and fresh thyme. This maintains a low glycemic index while providing high-quality protein.
Can a diabetic eat baked chicken?
Yes, baked chicken is an excellent choice. It is naturally low in carbohydrates and high in protein. Just ensure you avoid sugary glazes or flour based breading.
How to bake boneless chicken breasts?
Preheat the oven and cook until the internal temperature hits 165°F. Season the breasts with salt and pepper and bake in a dish. Pounding them to an even thickness first ensures a faster, more consistent cook.
How to bake a chicken breast at 350 degrees?
Bake for 20 to 30 minutes. Remove the meat from the oven when the internal temperature reaches 160°F and let it rest for 5 minutes to reach the final 165°F.
Pan Seared Chicken

