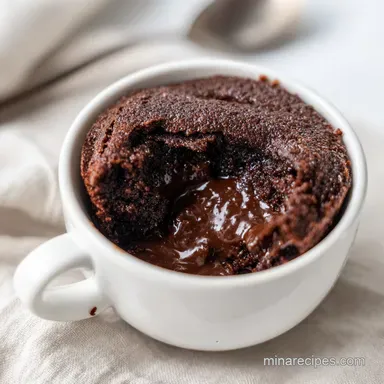
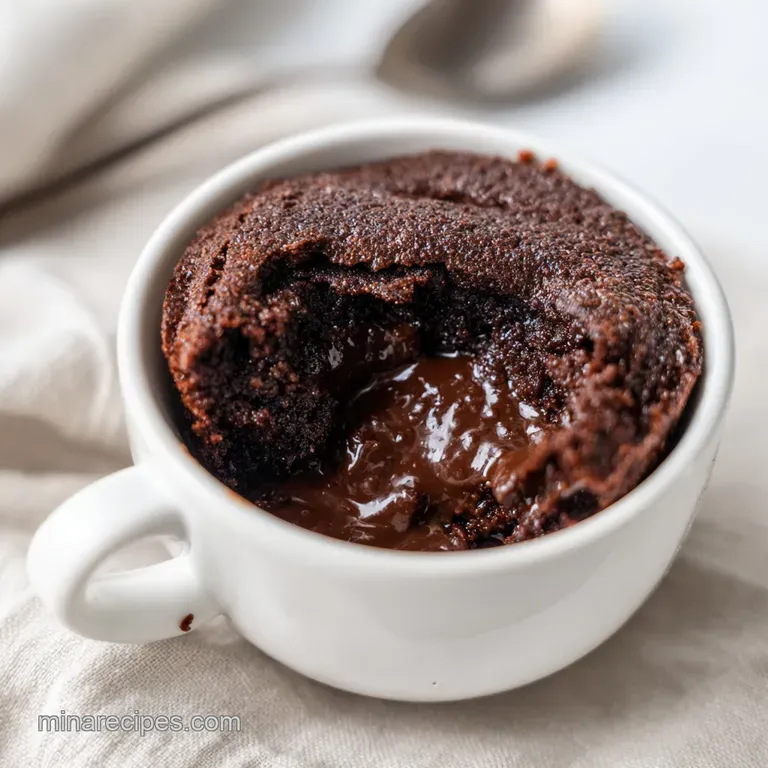
Microwave Mug Brownie: Gooey and Rich
- Time: 5 min active + 2 min cooking + 3 min resting = Total 10 minutes
- Flavor/Texture Hook: Velvety, dense center with a slight crackle on top
- Perfect for: Midnight cravings, solo dessert nights, or a quick sugar fix
That deep, earthy scent of cocoa hitting the air the second the microwave door swings open is honestly one of the best smells in the world. I remember one rainy Tuesday when I was completely exhausted, starving for something sweet, but the thought of preheating an oven for 40 minutes felt like a marathon I wasn't prepared to run.
I just wanted something warm, chocolatey, and immediate.
I ended up throwing together a few pantry staples in my favorite oversized ceramic mug. The result wasn't a fancy pâtisserie dessert, but it was a warm, gooey, comforting heap of chocolate that solved every single one of my problems in under ten minutes.
That's the beauty of a Microwave Mug Brownie, it's not about being a culinary masterpiece, it's about satisfying a craving right now.
You can expect something far more dense than a typical mug cake. We aren't going for a fluffy sponge here. Instead, we're aiming for that velvety, almost underbaked consistency that makes a brownie feel indulgent.
It's rustic, it's quick, and it's exactly what you need when you can't be bothered with a full baking sheet.
Microwave Mug Brownie
Why the center stays gooey
Rather than using eggs, which can make microwave desserts rubbery, this recipe relies on a specific balance of fat and sugar.
Fat Saturation: Melted butter coats the flour proteins, which stops too much gluten from forming and keeps the texture velvety.
Sugar Humidity: The sugar holds onto moisture during the short cook time, preventing the brownie from drying out.
Residual Carryover: Letting the mug sit for a few minutes allows the heat to move from the edges to the center without overcooking the outside.
| Method | Time | Texture | Best For |
|---|---|---|---|
| Microwave | 10 mins | Gooey/Dense | Single servings |
| Oven | 45 mins | Chewy/Crusty | Party crowds |
| Air Fryer | 20 mins | Fudgy/Firm | Small batches |
Component Analysis
| Ingredient | Science Role | Pro Secret |
|---|---|---|
| Cocoa Powder | Flavor & Structure | Sift it to avoid bitter lumps |
| Granulated Sugar | Texture & Sweetness | Use brown sugar for more chew |
| Unsalted Butter | Moisture & Mouthfeel | Brown the butter first for nuttiness |
| Whole Milk | Hydration | Room temperature prevents splitting |
Recipe Specs
Let's be real, the magic here is in the simplicity. You don't need a stand mixer or a fancy scale, though using one helps if you're a stickler for consistency. This is a flavor first approach where we prioritize that rich, chocolatey hit over a perfect rise.
Since we are dealing with such small volumes, every tablespoon counts. If you add too much flour, you'll end up with something that tastes like a chocolate biscuit. Too little, and it'll be a puddle of chocolate soup. Stick to the measurements, but don't stress if your tablespoon isn't perfectly level.
According to the USDA FoodData Central, cocoa powder is surprisingly rich in minerals, but in this case, we're mostly interested in its ability to provide that deep mahogany color and intense flavor. It's the heart of the dish.
What You'll Need
I've found that using a wider mug actually helps the brownie cook more evenly. If your mug is too narrow and tall, the edges might overcook before the middle even gets warm. Look for something that holds about 12 ounces.
The Dry Base
- 4 tbsp (30g) all purpose flourWhy this? Provides the essential structure
- 3 tbsp (25g) unsweetened cocoa powderWhy this? Intense chocolate flavor
- 3 tbsp (38g) granulated sugarWhy this? Creates the fudgy texture
- 1 pinch (0.5g) saltWhy this? Balances the sweetness
The Wet Mix
- 2 tbsp (28g) unsalted butter, meltedWhy this? Adds richness and velvetiness
- 2 tbsp (30ml) whole milkWhy this? Binds the ingredients together
- 1/4 tsp (1.25ml) vanilla extractWhy this? Enhances the cocoa notes
For those who don't have whole milk, you can use almond milk, but it might be slightly less rich. If you're out of butter, coconut oil works well, though it adds a slight tropical hint to the finish.
Equipment Needed
You really don't need much, which is the best part. I usually just use a fork for everything, but a small whisk can help if your cocoa powder is particularly clumpy.
- Microwave safe ceramic mug (12oz)
- Small fork or mini whisk
- Measuring spoons
- Small bowl (only if you prefer melting butter separately)
Chef Note: If you want to be extra, grease the inside of the mug with a tiny bit of butter. It makes cleaning up so much easier and ensures every last bit of the brownie slides out if you decide to flip it onto a plate.
Bringing It Together
Let's crack on with the actual making. This is a fast process, so have your ingredients ready to go before you start.
- Whisk together the flour, cocoa powder, sugar, and salt in your mug. Note: Make sure there are no large cocoa clumps.
- Pour in the melted butter, milk, and vanilla extract.
- Stir gently with a fork until the batter is smooth and glossy. Note: Stop as soon as the flour streaks disappear to avoid overmixing.
- Place the mug in the center of the microwave.
- Heat on high for 60 to 90 seconds. until the edges look set, but the center still appears slightly wet and shimmering.
- Remove the mug carefully using a towel or oven mitt.
- Let the brownie sit undisturbed for 2 to 3 minutes. Note: This is the most important part for the texture.
- Serve warm directly from the mug.
Precision Checkpoints
- Temperature: Ensure butter is melted but not boiling.
- Visual Cue: The top should look "tacky" and not liquid, but not dry.
- Rest Time: Exactly 3 minutes is the sweet spot for a fudgy center.
Troubleshooting Guide
The most common issue I see is the "rubber effect". This usually happens when someone overcooks the batter. Microwaves cook from the outside in, so the edges can become tough while you're waiting for the middle to stop wobbling.
| Issue | Solution |
|---|---|
| Why Your Brownie Is Rubbery | This is almost always due to overcooking. Once the proteins in the flour and milk overheat, they tighten up, creating a spongy or rubbery texture. Pull it out earlier than you think you should. |
| Why Your Brownie Is Raw | If the center is completely liquid after the rest period, your microwave might have a lower wattage. Try adding 15 second bursts of heat, but be careful not to go too far. |
| Why Your Brownie Overflowed | This usually happens if you use a mug that is too small or if you added extra leavening agents (like baking powder) that weren't in the original recipe. Stick to the mug size suggested. |
Common Mistakes Checklist
- ✓ Didn't overmix the batter (stopped when smooth)
- ✓ Used a microwave safe mug (no metal or plastic)
- ✓ Let the brownie rest for at least 2 minutes
- ✓ Measured flour by spooning it in, not packing it
- ✓ Placed the mug in the center of the turntable
Make It Your Own
Once you've nailed the basic Microwave Mug Brownie, you can start playing with the mix. I love adding a teaspoon of peanut butter right into the center of the batter before cooking to create a molten core.
If you're feeling fancy, try adding a pinch of espresso powder to the dry ingredients. It doesn't make the brownie taste like coffee, but it makes the chocolate taste more intense. For those who want something even more decadent, a few mini chocolate chips folded in at the end are a must.
If you're in the mood for something different, you might enjoy my fudgy brownies for a larger crowd, or maybe some edible cookie dough if you want a treat that requires zero heat.
Customization Options
- Lava Center: Drop a square of dark chocolate in the middle.
- Nutty Crunch: Add 1 tbsp of chopped walnuts or pecans.
- Salted Finish: Sprinkle flaky sea salt on top immediately after cooking.
| Goal | Adjustment | Impact |
|---|---|---|
| More Chew | Swap sugar for brown sugar | Denser, molasses like flavor |
| dairy-free | Use coconut oil and soy milk | Slightly nuttier taste |
| Extra Rich | Add 1 tsp instant coffee | Deepens chocolate profile |
Preservation Secrets
Honestly, these are best eaten immediately. A Microwave Mug Brownie loses its magic as it cools because the fats solidify and the moisture redistributes. But if you have leftovers, you can save them.
Storage Guidelines Cover the mug with plastic wrap and keep it in the fridge for up to 2 days. It will become much denser and more like a fudge truffle.
Reheating Pop it back in the microwave for 15-20 seconds. Don't go longer, or you'll turn it into a rubber ball.
Zero Waste Tips If you have a small amount of cocoa powder left in the bag, don't throw it away. Mix it into your morning oatmeal or stir it into Greek yogurt for a quick chocolate fix. You can also use any leftover melted butter to grease your pans for other recipes.
What to Serve This With
Since this is a rustic, uncomplicated dessert, you can keep the presentation simple or dress it up depending on who you're impressing.
Plating Levels
The Simple Way Eat it straight out of the mug with a spoon. Maybe a quick dollop of store-bought whipped cream on top. This is the ultimate comfort mode.
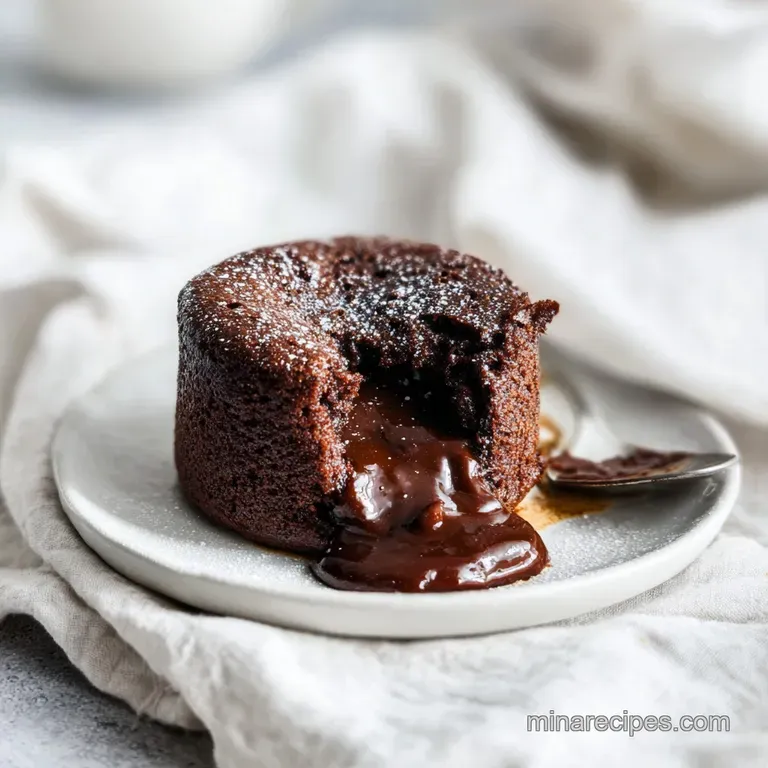
The Polished Look Carefully flip the brownie onto a small dessert plate. Add a handful of fresh raspberries on the side and a dusting of powdered sugar. It looks intentional and thoughtful.
The Restaurant Style Place the brownie on a white plate, drizzle a bit of raspberry coulis or salted caramel around the base, and top with a scoop of high-quality vanilla bean ice cream. Add a single mint leaf for a pop of color.
| Level | Plating Key | Vibe |
|---|---|---|
| Simple | In the mug | Lazy Sunday |
| Polished | Plated with berries | Date night |
| Restaurant | Ice cream & sauce | Special treat |
Right then, you've got everything you need to make a killer Microwave Mug Brownie. Just remember: don't overcook it, let it rest, and enjoy that chocolatey goodness while it's still warm. Trust me on this, your midnight cravings will thank you.
Recipe FAQs
Can you make brownies in a mug in the microwave?
Yes, it is a fast and effective way to satisfy a chocolate craving. Simply use a microwave safe mug and heat on high for 60 to 90 seconds to achieve a fudgy center.
How to make a 5 minute mug brownie?
Whisk together the flour, cocoa powder, sugar, and salt in a microwave safe mug. Stir in the melted butter, milk, and vanilla until smooth, then microwave on high for 60 to 90 seconds.
How to make a mug cake with 3 ingredients?
Combine cocoa powder, sugar, and melted butter. While this creates a basic sweet treat, using the full seven ingredient list provided in this recipe ensures a professional, cake like structure.
How do you make a two ingredient brownie in a mug?
Blend cocoa powder and melted butter together. For a more complex flavor and a proper fudgy consistency, we recommend following the complete method including flour and milk.
Why is my mug brownie rubbery?
You likely overcooked the batter. Because microwaves cook from the outside in, you should pull the mug out when the center still appears slightly wet and shimmering.
Can I substitute whole milk for another option?
Yes, most milk alternatives work well. If you enjoyed mastering the texture in our monster stuffed cookies, you can apply that same preference for creamy fats by using a thick plant based milk here.
How long should the brownie sit after microwaving?
Let the mug sit undisturbed for 2 to 3 minutes. This allows the residual heat to finish the cooking process and ensures the brownie sets into a fudgy consistency.
Microwave Mug Brownie