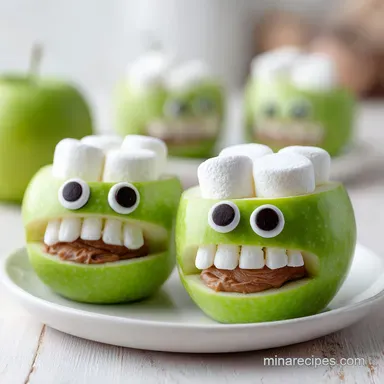
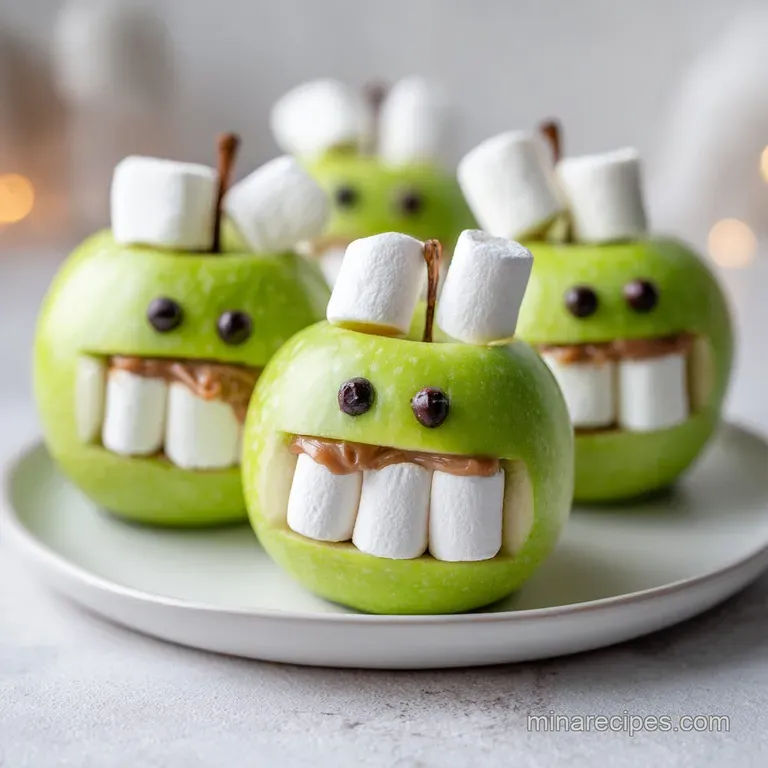
Spooky Monster Apple Mouths: Apple Slice Halloween Snack
- Time:10 minutes active = Total 10 minutes
- Flavor/Texture Hook: Tart, crisp apples paired with velvety peanut butter and chewy marshmallows
- Perfect for: School parties, healthy kids' snacks, or last minute Halloween platters
- Creating a Healthy and Cute Apple Slice Halloween Snack
- Quick Glance at the Snack Details
- The Essential Components for Monster Mouths
- Basic Tools for Quick Assembly
- Simple Steps to Assemble Your Spooky Treats
- Common Assembly Fixes and Troubleshooting
- Creative Variations for Different Tastes
- Storage Guidelines and Zero Waste Tips
- Plating Your Treats for Maximum Impact
- Recipe FAQs
- 📝 Recipe Card
Creating a Healthy and Cute Apple Slice Halloween Snack
The sharp, clean snap of a cold Granny Smith apple is the best part of this treat. I can still remember the first time I brought these to a neighborhood get together. I had tried making these fancy, sugar heavy cupcakes for a previous party, and half of them ended up on the floor or ignored because they were too rich.
These monster mouths were different. The smell of nutty peanut butter and the bright green of the apples caught everyone's eye immediately.
The best part was watching the kids actually fight over who got the "scariest" one. It's a relief to have something on the table that isn't just a pile of processed candy. This Apple Slice Halloween Snack proves that you don't need a kitchen full of dyes and corn syrup to make something that looks festive and exciting.
We're keeping this focused on fresh ingredients and a bit of assembly logic. You'll get a crisp, tart base, a creamy glue, and a playful look that takes almost zero effort. It's the kind of prep that makes you feel like a pro without actually spending your whole afternoon in the kitchen.
Quick Glance at the Snack Details
Before we dive into the assembly, let's look at the logistics. This is a high speed recipe, but there are a few small details that make the difference between a monster that looks great and one that "melts" on the plate.
Since this is usually a party food, you need to know how much to make. I've found that most guests take about two or three of these if they're part of a larger spread.
| Servings | Ingredient Adjustments | Pan/Platter Size | Assembly Time |
|---|---|---|---|
| 5 people | 2 apples, 1/2 cup PB | Medium Platter | 10 minutes |
| 10 people | 4 apples, 1 cup PB | Large Sheet Tray | 20 minutes |
| 20 people | 8 apples, 2 cups PB | 2 Large Trays | 40 minutes |
Because these don't require heat, you have a choice in how you prep the fruit. Some people prefer pre sliced apples for speed, but there's a trade off in quality.
| Fruit Source | Prep Time | Texture | Best For |
|---|---|---|---|
| Fresh Sliced | 5 mins | Shatter crisp | high-quality parties |
| Pre cut Bags | 0 mins | Slightly soft | Extreme time crunches |
The Essential Components for Monster Mouths
The magic here isn't in a complex technique, but in the interaction of the ingredients. You want a specific balance of acidity and fat to ensure the snack stays fresh and the toppings don't slide off.
- Oxidation Control
- Lemon juice provides citric acid, which interferes with the enzyme that turns apples brown.
- Structural Adhesion
- The high fat and protein content in peanut butter creates a thick, tacky bond for the marshmallows.
- Textural Contrast
- The contrast between the firm apple and the airy marshmallow creates a satisfying mouthfeel.
To get the most out of these ingredients, you have to pick the right apple. I always go with Granny Smith because they hold their shape and the tartness cuts through the richness of the nut butter.
| Ingredient | Science Role | Pro Secret |
|---|---|---|
| Granny Smith | Structural Base | Cold apples are firmer and snap better |
| Lemon Juice | Color Preservation | Toss immediately after slicing |
| Peanut Butter | Binding Agent | Stir well to ensure the oil is incorporated |
Basic Tools for Quick Assembly
You don't need any heavy machinery for this. I usually just clear off a small section of my counter and set up an assembly line. It keeps the process organized and prevents you from having to walk back and forth across the kitchen.
For the slicing, a sharp chef's knife is essential. If your knife is dull, you'll end up crushing the apple cells, which actually makes them brown faster regardless of the lemon juice. A simple mixing bowl is all you need for the citrus bath.
If you're making these for a large crowd, I recommend using a parchment lined baking sheet. It allows you to assemble 16 or more treats at once and then slide the whole sheet into the fridge to set. Trust me, it's way faster than doing them one by one on a plate.
Simple Steps to Assemble Your Spooky Treats
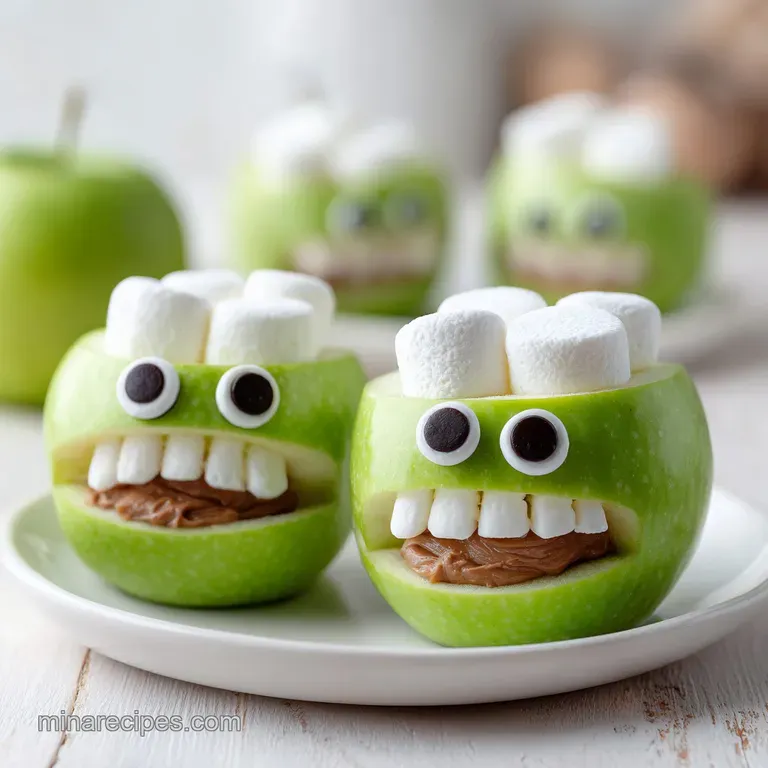
Now we get to the fun part. Keep your ingredients laid out in order - apples first, then the "glue," then the teeth and eyes.
- Core the apples and slice them into rounds approximately 1/2 inch (1.3cm) thick. Note: Consistent thickness ensures they all fit on the platter.
- Toss the apple slices in a bowl with 1 tbsp of lemon juice until they are lightly coated.
- Lay the apple slices flat on your workspace.
- Spread approximately 1 tsp of nut butter onto the center of each slice, leaving a small border. Note: Don't go too thick or the marshmallows will sink.
- Slice 16 mini marshmallows in half lengthwise.
- Press the halved mini marshmallows into the nut butter in a row until they form a toothy grin.
- Place two mini chocolate chips just above the mouth area.
- Press the chocolate chips firmly into the apple until they are secure and won't roll off.
Common Assembly Fixes and Troubleshooting
Even with a simple snack, things can go sideways. The most common issue I see is the "sliding tooth" syndrome, where the marshmallows just slip off the peanut butter. This usually happens if the nut butter is too runny or the apple is too wet.
Why Your Marshmallows Slide
If your peanut butter is a natural variety with a lot of oil on top, it won't be sticky enough. Make sure you stir it thoroughly until it's a homogenous, thick paste. If it's still too loose, pop the apple slices in the fridge for 5 minutes after spreading the butter to "set" the glue before adding the teeth.
Why Your Apples Turn Brown
This happens when the lemon juice doesn't reach all the surfaces of the slice. Instead of just drizzling it, actually toss the slices in a bowl. If you're prepping these hours in advance, you can soak them in a mix of water and lemon juice for 2 minutes, then pat them dry before adding the nut butter.
| Problem | Root Cause | Solution |
|---|---|---|
| Brown Slices | Oxidation | Increase lemon juice toss time |
| Falling Teeth | Thin nut butter | Use creamy, stabilized PB or chill first |
| Soggy Base | Too much juice | Pat slices dry before adding PB |
- ✓ Pat apple slices dry after the lemon bath to ensure the nut butter sticks.
- ✓ Use a small spoon or a piping bag for the peanut butter to keep edges clean.
- ✓ Cut marshmallows with sharp scissors for a clean, flat edge.
- ✓ Keep apples chilled until the moment you slice them.
Creative Variations for Different Tastes
While the classic version is great, you can easily pivot this to fit different dietary needs or flavor cravings. If you're looking for something even more indulgent to serve alongside these, you might try my edible cookie dough recipe for a decadent contrast.
For those who can't have peanuts, almond butter or sunflower seed butter work beautifully. Sunbutter is especially great for school environments where nuts are banned.
Decision Shortcut:
- If you want a saltier vibe, do Y: Use chunky peanut butter and a pinch of sea salt.
- If you want it sweeter, do Y: Use honey roasted almond butter.
- If you want a fruitier "mouth", do Y: Replace marshmallows with thin banana slices.
| Original Ingredient | Substitute | Why It Works |
|---|---|---|
| Peanut Butter | Almond Butter | Similar fat content. Note: Slightly thinner consistency |
| Peanut Butter | SunButter | Nut free and safe for schools. Note: More earthy flavor |
| Mini Marshmallows | Banana Slices | Natural sweetness. Note: Softer texture than marshmallows |
Storage Guidelines and Zero Waste Tips
These are best eaten fresh, but you can store them if you're prepping for a party. Place them in a single layer in an airtight container. I've found they stay crisp in the fridge for about 24 hours. After that, the marshmallows start to absorb moisture from the apple and get a bit gummy.
If you're planning a larger dessert table and need other components, a stable cream cheese frosting is a great addition for accompanying cupcakes.
Regarding zero waste, don't throw away those apple cores and peels. You can toss them into a compost bin or even simmer the peels with a cinnamon stick and a bit of water to make a quick, fragrant stovetop potpourri. It makes the whole house smell like autumn without using artificial sprays.
Plating Your Treats for Maximum Impact
To make this Halloween Snack with Apple Slices look professional, avoid just piling them up. Arrange them in a circular pattern on a dark platter to make the green of the Granny Smiths pop.
I like to scatter a few extra mini marshmallows and chocolate chips around the base of the platter to fill in the gaps. You can also add a few sprigs of mint or some dark grapes to create a "swamp" effect around the monster mouths.
For a really a professional touch, use a small offset spatula to ensure the peanut butter is spread evenly. When you're finished, the contrast of the bright green apple, the cream colored teeth, and the dark chocolate eyes creates a visual that's both cute and creepy, making it a standout healthy Halloween snack for kids.
Recipe FAQs
How to prevent the apple slices from browning?
Toss the apple slices in 1 tbsp of lemon juice. This acid prevents oxidation and keeps the slices looking fresh for serving.
Can I make these Halloween snacks in advance?
Yes, but keep them refrigerated. Place them in a single layer in an airtight container to maintain freshness.
Is it true that these snacks must be served immediately to avoid gummy marshmallows?
No, this is a common misconception. They stay crisp in the fridge for about 24 hours before the marshmallows begin to absorb moisture.
How to assemble the monster mouth teeth?
Press halved mini marshmallows into the creamy peanut butter in a row. Leave a small border around the edge of the apple slice for a cleaner look.
How to keep the chocolate chip eyes from falling off?
Press the chips firmly into the peanut butter. Place them directly above the marshmallow mouth to ensure they are secure.
Do these snacks need to be cooked or baked?
No, this is a no-bake recipe. Total preparation time is only 10 minutes.
How to slice the apples for the best results?
Core the Granny Smith apples and cut them into rounds approximately 1/2 inch thick. This thickness provides a sturdy base for the toppings.
Apple Slice Halloween Snack