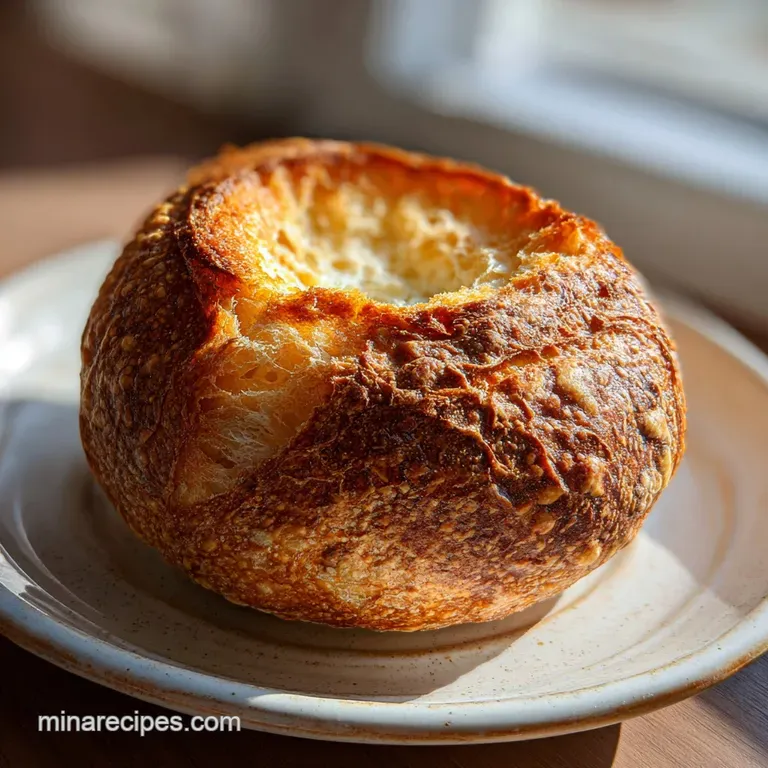
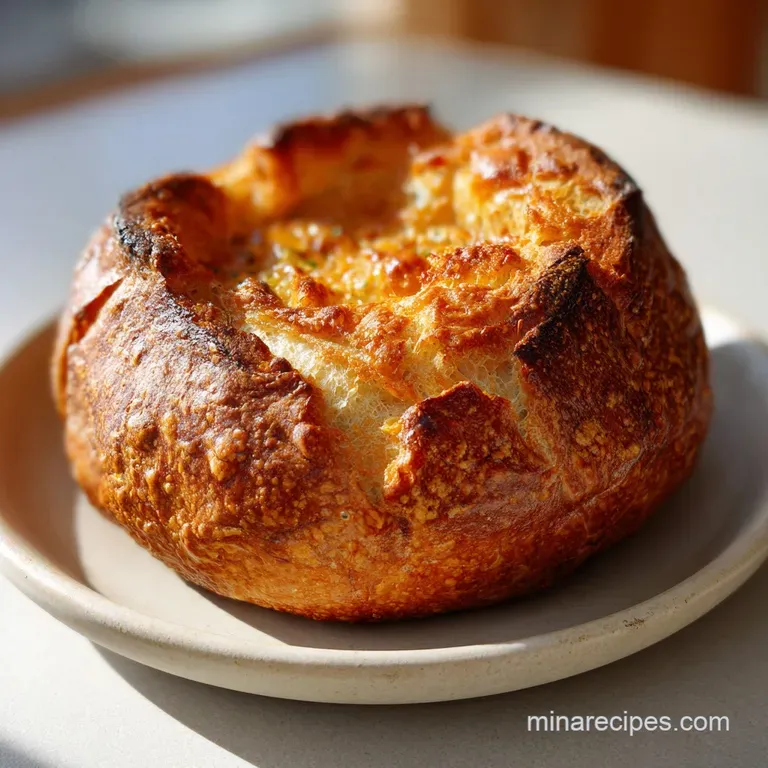
Homemade Bread Bowls: Shatter Crisp and Soft
- Time: 20 min active + 2 hours 10 mins rising = Total 2 hours 45 mins
- Flavor/Texture Hook: Shatter crisp exterior with a soft, pillowy center
- Perfect for: Cozy winter dinners, dinner parties, or a comforting weekend lunch
- Easy homemade bread bowls from scratch
- The secrets to a sturdy crust
- Ingredient breakdown and why they matter
- Essential gear for baking
- Step by step baking guide
- Common mishaps and easy fixes
- Troubleshooting Common Issues
- Different flavors to try
- Scaling and adjustments
- Bread myths debunked
- Storage and zero waste tips
- The best filling ideas
- Recipe FAQs
- 📝 Recipe Card
Easy homemade bread bowls from scratch
That smell of warm, yeasty dough hitting the air is honestly one of the best things in the world. I remember the first time I tried to "hack" this by just hollowing out a store-bought sourdough loaf.
It looked great for about three minutes, but then the soup soaked straight through the bottom, and I ended up with a soggy mess on my dining table. It was a disaster, but it taught me that if you want a vessel that actually holds liquid, you have to build it for the job.
Forget everything you've heard about needing a professional bakery oven or a fancy proofing box to get this right. You don't need a degree in baking or expensive equipment to make a rustic, comforting loaf.
The secret isn't some high tech gadget, it's just giving the yeast enough time to do its thing and getting that crust deep enough in color to act as a natural barrier.
When you make these homemade bread bowls, you're not looking for a delicate, refined pastry. You want something sturdy and uncomplicated. We're going for a rustic look where the charm comes from the golden brown edges and the warmth of the bread.
Trust me, a few imperfections in the shape actually make it feel more authentic and homemade.
The secrets to a sturdy crust
Instead of thinking about the chemistry, I think about the bread as a structural project. We need a wall that doesn't collapse under the weight of a heavy chili or a creamy chowder.
- Yeast Fuel: The sugar isn't for sweetness, it's food for the yeast. This ensures the dough rises consistently, creating those tiny air pockets that make the bread light.
- Gluten Skeleton: Kneading for a full 10 minutes builds a network of protein that acts like a scaffold. This is what keeps the bowl from sagging when you fill it.
- The Egg Barrier: Brushing the top with egg and milk creates a sealed, glossy skin. According to King Arthur Baking, this protein rich wash helps the crust brown deeply and resist moisture.
- The Hollow Effect: Baking until the bottom sounds hollow means the moisture has evaporated from the center. This ensures the "bowl" part is dry and ready to be carved.
| Method | Time | Texture | Best For |
|---|---|---|---|
| Oven (Scratch) | 2 hours 45 mins | Thick, sturdy crust | Heavy soups, long dinners |
| Stovetop (Toast) | 15 minutes | Thin, crisp exterior | Quick lunches, light dips |
| Bread Machine | 3 hours | Consistent, soft | Meal prep, large batches |
I've found that the oven method is the only way to go if you're serving something like a thick beef stew. The stovetop version is fine for a quick dip, but it just doesn't have the structural integrity for a full meal.
Ingredient breakdown and why they matter
When you're putting together your list, don't bother with low-fat alternatives. Bread is about the fat and the flour.
| Ingredient | Science Role | Pro Secret |
|---|---|---|
| All purpose Flour | Provides the structure | Sift it first to avoid lumps in the dough |
| Active Dry Yeast | Creates the rise | Check the foam; if it doesn't bubble, start over |
| Unsalted Butter | Softens the crumb | Ensure it's cooled so it doesn't kill the yeast |
| Egg Wash | Colors the crust | Add a splash of milk for a more velvety shine |
Essential gear for baking
You don't need a massive arsenal, but a few basics make the process much smoother. I usually use a large stainless steel bowl for the first rise because it's easy to grease and doesn't hold onto smells. For the kneading, a clean countertop with a light dusting of flour is your best friend.
If you have a kitchen scale, use it. Measuring flour by the cup can be wildly inconsistent depending on how packed the flour is. I always use grams to make sure my homemade bread bowls come out the same way every single time.
For the final shaping, a standard baking sheet works, but I prefer using one with a lip so if the butter bubbles over, it doesn't smoke in the bottom of my oven. And definitely keep a serrated knife handy for the hollowing process, or you'll crush the bread.
Step by step baking guide
Right then, let's get into the actual making. This is where the magic happens.
- Activate the yeast. Combine the warm water, sugar, and yeast in a mixing bowl. Stir gently and let sit for 5–10 minutes until the mixture becomes foamy and smells like a brewery.
- Mix the dough. Stir in the melted butter, then gradually add the flour and salt. Note: Add flour slowly so the dough doesn't become too dry.
- Develop the gluten. Knead the dough on a floured surface for 8–10 minutes until the dough feels smooth, elastic, and bounces back when poked.
- First rise. Place the dough in a greased bowl, cover it with a damp cloth, and let rise in a warm spot for 1 hour until it has doubled in size.
- Shape the balls. Punch down the dough to release air. Divide into 6 equal portions and roll each into a tight, smooth ball.
- Second rise. Place balls on a baking sheet, flatten the tops slightly with your palm, cover, and let rise for another 45–60 minutes.
- Glaze and bake. Preheat the oven to 375°F (190°C). Gently brush the tops with the beaten egg and milk mixture. Bake for 20–25 minutes until the tops are deep mahogany and the bottoms sound hollow when tapped.
- Cool and carve. Allow the bowls to cool for 10 minutes. Use a serrated knife to cut a circle out of the top and carve out the center, leaving a 1/2 inch thick wall.
| Original Ingredient | Substitute | Why It Works |
|---|---|---|
| All purpose Flour | Bread Flour | Higher protein. Note: Results in a chewier, tougher crust |
| Unsalted Butter | Coconut Oil | Similar fat content. Note: Adds a very slight tropical scent |
| Whole Milk | Almond Milk | Liquid base for wash. Note: Less brown than cow's milk |
| Active Dry Yeast | Instant Yeast | Faster activation. Note: Skip the 10 min foaming step |
If you're feeling adventurous, you can add some dried herbs to the flour mixture. I love adding a pinch of rosemary to make these homemade bread bowls feel a bit more rustic.
Common mishaps and easy fixes
The biggest frustration for most people is when the bread ends up too dense. This usually happens because the yeast didn't activate or the kitchen was too cold. If your house is chilly, try putting the dough in the oven with just the oven light on.
Troubleshooting Common Issues
| Issue | Solution |
|---|---|
| Why Your Bread Didn't Rise | If your dough stays flat, it's usually a temperature issue. Yeast is a living thing, and if the water was too hot (over 130°F), you might have killed it. If it was too cold, it's just sleeping. |
| Why the Bottom Is Soggy | Sogginess happens when the bread is hollowed out while it's still steaming hot. The steam turns into moisture, which weakens the bottom wall. Always wait at least 10 minutes before carving. |
| Why the Crust Is Pale | A pale crust often means the oven wasn't fully preheated or the egg wash was too thin. Make sure the oven hits 375°F (190°C) before the trays go in. |
Common Mistakes Checklist:
- ✓ Did you check that the yeast foamed before adding flour?
- ✓ Did you knead for the full 10 minutes, or did you stop too early?
- ✓ Is the oven truly at 375°F (190°C)?
- ✓ Did you wait for the bread to cool before hollowing?
- ✓ Did you leave enough thickness in the walls to support the soup?
Different flavors to try
Since these are essentially blank canvases, you can really have fun with the flavor. For a savory twist, I like to mix in some grated parmesan and garlic powder into the flour. This makes them incredible for Slow Cooker French Dip Sandwiches style fillings, where the beef jus soaks into the cheesy crust.
If you want something a bit more refined, try adding a tablespoon of honey to the water. It doesn't make the bread sweet, but it gives the crust a darker, more caramelized color that looks stunning on a dinner table.
For those who want a heartier vibe, try swapping 1/2 cup of the all purpose flour for whole wheat flour. It changes the texture slightly, making it denser, but the flavor becomes much more rustic and nutty.
Scaling and adjustments
When you're making these for a crowd, you might want to double the batch. But be careful: don't just double the yeast. I've found that scaling salt and yeast to about 1.5x rather than 2x often gives a more controlled rise and a better flavor.
If you're only making 2 or 3 bowls, use a smaller baking sheet. If there's too much empty space in the oven, the heat circulates differently, and you might need to reduce your bake time by about 5 minutes.
For those using a bread machine, you can use the "dough" setting for the first rise and kneading. Once the machine beeps, just move the dough to a floured surface and follow the shaping and baking steps from the oven method.
Bread myths debunked
You've probably heard that you have to "punch down" the dough aggressively to stop it from over rising. Honestly, you just need to gently press the air out. Being too aggressive can damage the gluten structure we worked so hard to build during the kneading phase.
Another common myth is that you can't use all purpose flour for bread bowls because it lacks the strength of bread flour. While bread flour is great, all purpose is perfectly fine for this recipe. Since these aren't massive loaves, the protein in AP flour is plenty to hold a bowl of soup.
Storage and zero waste tips
If you don't use all your homemade bread bowls at once, you can store the baked (but un hollowed) loaves in an airtight bag at room temperature for 2 days. For longer storage, throw them in the freezer for up to 3 months. Just thaw them in the fridge overnight before reheating.
To reheat, pop them in a 350°F (175°C) oven for about 5-8 minutes. This brings back that shatter crisp exterior without drying out the inside.
Don't throw away the bread you carve out of the center! That's the best part. I usually cube the center pieces, toss them with a bit of melted butter and garlic, and toast them in the oven to make homemade croutons. They're the perfect addition to the soup inside the bowl.
The best filling ideas
Now for the fun part: what goes inside. To make these look like they came from a high end bistro, focus on color balance. A brown bread bowl needs bright accents to pop. I recommend adding a swirl of white sour cream, a sprinkle of bright green chives, and a dash of red paprika on top.
These are a dream for a thick corn chowder or a hearty beef chili. If you're serving a lighter soup, I suggest brushing the inside of the hollowed bowl with melted butter and toasting it in the oven for 2 minutes before filling. This creates an extra layer of protection against sogginess.
If you're planning a full meal, these pair perfectly with a side of Corn Casserole, which complements the rustic nature of the bread. Just remember to fill the bowls right before serving so your guests can enjoy that contrast between the hot soup and the crisp crust.
Recipe FAQs
How do I keep my bread bowl from getting soggy?
Wait 10 minutes after baking before carving. Carving while the bread is steaming hot traps moisture inside, which weakens the bottom wall and leads to sogginess.
What kind of bread should be used for bread bowls?
A sturdy, white yeast bread. All-purpose flour provides the necessary structure to hold heavy liquid fillings without the walls collapsing.
Why did my bread bowls fail to rise?
The water temperature was likely incorrect. Yeast dies if the water exceeds 130°F and remains dormant if the water is too cold to activate it.
How do I reheat leftover bread bowls?
Place them in a 350°F (175°C) oven for 5-8 minutes. This restores the shatter crisp exterior without drying out the inside of the loaf.
Is it true that I can carve out the center immediately after baking?
No, this is a common misconception. Immediate carving traps steam inside the bread, which turns into moisture and makes the base soggy.
How do I get a deep mahogany crust?
Brush the risen dough with an egg wash. Combining a beaten egg and milk ensures a rich, professional color when baked at 375°F.
How should I store unhollowed loaves?
Keep them in an airtight bag at room temperature for 2 days. If you enjoyed the process of shaping these loaves, apply similar skills to our pinwheel cookies.
Homemade Bread Bowls

