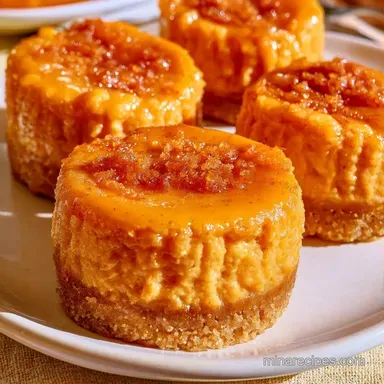
Mini Pumpkin Cheesecake Muffins with Graham Crust

- Time: 20 min active + 2 hours chilling
- Flavor/Texture Hook: Tangy cream cheese with a spiced, earthy pumpkin center
- Perfect for: Autumn potlucks or a quick weekend treat for the kids
Mini Pumpkin Cheesecake Muffins Made Easy
Nothing kills a party mood like serving a dessert that feels like a rubber ball. I've been there. I once whipped my pumpkin filling for ten minutes thinking more air meant more fluff, and I ended up with Mini Pumpkin Cheesecake Muffins that actually bounced when I dropped them on the counter.
It was a disaster, and the texture was more like a sponge than a cheesecake.
The fix is actually pretty simple: stop mixing the moment the eggs disappear. Most people overwork the batter, which traps air bubbles that expand in the oven and then collapse, leaving you with that rubbery, pitted top. This version focuses on a slow and steady approach to keep things rich and heavy.
You can expect a treat that feels rustic and comforting. These aren't meant to look like they came from a high end patisserie, but they taste like they did. We're going for a deep orange center, a golden brown crust, and a creamy finish that doesn't require a fancy water bath.
Getting the Texture Right
- Room Temp Ingredients: Cold cream cheese creates lumps that you can't beat out without over mixing the batter. Softening it first ensures a smooth blend.
- Pre baked Crust: Baking the graham cracker base for 5 minutes creates a moisture barrier. This stops the pumpkin filling from soaking into the crust and making it mushy.
- Low Speed Egg Integration: Adding eggs one by one on the lowest setting prevents air pockets from forming. This is what keeps the texture dense and rich.
If you're looking for something even faster, my Pumpkin Cream Cheese Muffins are a great alternative, though they have a more cake like crumb than these cheesecakes.
The main difference in the outcome comes down to the heat source. While these are baked, some people try to make "no bake" versions on a stovetop or in the fridge.
| Method | Time | Texture | Best For |
|---|---|---|---|
| Oven Baked | 35 mins | Dense and set | Traditional cheesecake taste |
| No Bake/Fridge | 4 hours | Soft and mousse like | Hot weather / No oven |
| Stovetop Steam | 20 mins | Very moist | Custard style preference |
Essential Gear for Baking
While a full suite of professional gear isn't necessary, a few key tools will simplify the process. A mini muffin pan is essential; I recommend a non-stick version to ensure the crusts don't cling to the sides.
To prepare the cream cheese, a hand mixer or a stand mixer like a KitchenAid is indispensable. Using a whisk is a strenuous task that often results in unwanted lumps. You will also need a small glass or a measuring spoon to firmly press the crumbs into place.
Lastly, pick up some parchment liners. Even with non-stick pans, these can be tricky to remove; liners ensure they pop out cleanly without cracking the crust.
The Grocery List
The kind of pumpkin puree you choose is key. I always stick with 100% pure pumpkin, avoiding the pie filling versions that are pre-loaded with sugar and spices. Using the pure puree gives us full control over the sweetness and spice levels.
| Component | Purpose | Substitute Notes |
|---|---|---|
| Full Fat Cream Cheese | Structure & Tang | Neufchâtel: Similar taste, slightly less fat |
| Pumpkin Puree | Flavor & Moisture | Roasted butternut squash: Earthier, less sweet |
| Graham Cracker Crumbs | Crunchy Base | Biscoff crumbs: Adds a caramelized, speculoos flavor |
| Pumpkin Pie Spice | Warmth | Cinnamon, nutmeg, and cloves mix |
For the Graham Cracker Crust 1 cup (100g) graham cracker crumbs Role: A timeless honey wheat base that pairs well with pumpkin 3 tbsp (42g) granulated sugar Role: Gives the crust a subtle crunch 4 tbsp (56g) unsalted butter, melted
Role: Acts as a binder and adds richness (Substitute: Coconut oil for dairy-free)
- 1/2 cup (100g) granulated sugar Role
- Offsets the cream cheese tang (Substitute: Maple syrup, but reduce pumpkin puree by 2 tbsp)
- 1/2 cup (120g) pumpkin puree Role
- Provides the essential fall flavor (Substitute: Sweet potato puree)
- 2 large eggs, room temperature Role
- Ensures the filling sets properly during baking
- 1 tsp (5ml) vanilla extract Role
- Smooths out the spices
- 1 tsp (2g) pumpkin pie spice Role
- Adds a traditional seasonal aroma
- 1/4 tsp (1.5g) salt Role
- Brings out the pumpkin's richness
Timing and Yield

Use a standard mini muffin tin for these treats. While the "total time" seems long, most of that is simply the cheesecakes chilling in the fridge. Proper cooling is essential, as they'll be too soft to remove from the liners if you rush it.
- Prep Time: 20 minutes
- Cook Time: 35 minutes (includes crust and filling)
- Total Time: 2 hours 55 minutes
- Yield: 24 mini cheesecake muffins
Now, let's dive into the baking process.
Step by step Baking
Preparing the Base
- Preheat your oven to 325°F (160°C).
- In a small bowl, stir the graham cracker crumbs, 42g sugar, and melted butter until it looks like wet sand.
- Spoon about 1 tablespoon of the mixture into each of the 24 mini muffin cups. Press firmly into the bottom and slightly up the sides using a small glass. Note: Pressing hard prevents the crust from crumbling later.
- Bake the crusts for 5 minutes, then remove them and let them cool while you prep the filling.
Whipping the Filling
- In a large bowl, beat the softened cream cheese and 100g sugar on medium high speed for 2-3 minutes until the mixture is smooth and fluffy.
- Mix in the pumpkin puree, vanilla, pumpkin pie spice, and salt. Stir until the color is a uniform, deep orange.
- Reduce the mixer to the lowest speed and add eggs one at a time. Mix just until the yellow disappears. Note: Over mixing here causes surface cracks.
- Divide the filling evenly among the pre baked crusts, filling each cup nearly to the brim.
- Bake for 20-25 minutes until the edges are set and slightly puffed, but the centers still have a tiny wobble.
- Let them cool on the counter, then chill in the fridge for 2 hours to set.
Chef's Tip: To get a more rustic look, don't smooth the tops perfectly. Leave a little swirl of the batter for a homemade feel.
Fixing Texture and Cracks
The most common issue is a filling that feels grainy. This happens when the cream cheese is too cold, creating tiny clumps that never fully integrate. If this happens, you can't really fix it once it's baked, so make sure that cheese is truly soft before you start.
Surface cracks are another annoyance. These usually occur because the oven is too hot or you beat too much air into the eggs. If you see cracks, don't panic; a dollop of whipped cream on top hides them perfectly.
Fixing a Soggy Crust
If the bottom is mushy, you likely skipped the pre bake or didn't press the crumbs down hard enough. For the next batch, ensure the crust is packed tight.
Avoiding Grainy Filling
Make sure the cream cheese is room temperature. If you're in a rush, microwave it for 10 seconds in 10 second bursts.
Stopping the Surface Cracks
Pull the muffins out when the center still wobbles slightly. They will firm up in the fridge.
| Problem | Fix |
|---|---|
| Rubbery texture | Reduce mixing time after adding eggs |
| Soggy base | Bake crust for 5 mins before adding filling |
| Cracked tops | Lower oven temp or bake for 2 mins less |
| Grainy filling | Use fully softened cream cheese |
Freshness and Scrap Tips
Toss these in a sealed tub and keep them chilled. They stay fresh in the fridge for about 4 days. If you can't eat them all, they freeze surprisingly well. Just place them on a tray first to freeze individually, then move them to a freezer bag. They'll last for about a month.
To eat them, let them thaw in the fridge overnight.
For zero waste, don't throw away the leftover graham cracker crumbs or the bit of cream cheese stuck to the bowl. Stir the leftover crumbs into some yogurt for a quick breakfast. The leftover cream cheese mixture can be spread on a piece of toast for a pumpkin spiced treat.
For more info on safe storage temperatures for dairy based desserts, USDA guidance is a great resource for home cooks.
Different Flavor Ideas
If you want to change things up, try adding a swirl of maple syrup on top of the batter before baking. It adds a woody sweetness that pairs with the pumpkin. You could also press a single pecan half into the center of each muffin for a bit of crunch.
For a different texture entirely, you might like my Pumpkin Cinnamon Muffins, which are lighter and more bread like.
- For a firmer set
- chill 4 hours instead of 2.
- For a crispier base
- bake crusts for 7 mins.
- For more spice
- add 1/2 tsp extra cinnamon to the filling.
| Original Ingredient | Substitute | Why It Works |
|---|---|---|
| Graham Crackers | Biscoff Cookies | Similar texture, more caramel flavor |
| Pumpkin Puree | Sweet Potato | Similar moisture, slightly sweeter |
| Granulated Sugar | Brown Sugar | Adds a molasses depth to the filling |
Serving and Pairing
Their small size makes them look lovely on a platter. To achieve a balanced look, I follow a three-step approach. First, a light sprinkle of cinnamon along the edges creates a rich brown ring. Second, add a small dollop of white whipped cream to the center.
Finally, a tiny bit of orange zest or a sliver of candied pumpkin on top adds a vibrant touch.
These pair beautifully with a strong cup of black coffee or a spiced chai latte. The coffee's bitterness helps balance the richness of the cream cheese. If you are serving these at a party, keep them on a chilled tray to ensure they maintain their dense, creamy structure.
Common Myths
Some believe a water bath is required for mini cheesecakes, but it isn't. Because they are so small, they bake through quickly enough that a water bath is simply unnecessary effort for minimal benefit.
Another misconception is that you can use low-fat cream cheese to reduce calories. Honestly, don't bother. low-fat versions contain more water, which often results in a loose filling that won't set properly in a mini muffin tin. Stick with full-fat cream cheese for the ideal consistency.
For those monitoring their intake, you can find general nutrient profiles for these ingredients at USDA FoodData Central.
Recipe FAQs
Can I use a mini muffin pan for these?
Yes, a mini muffin pan is perfect. Use liners for easy removal or grease the pan well to prevent sticking.
How to avoid cracks in the cheesecake?
Reduce mixer speed when adding eggs. Mixing only until combined prevents too much air from entering the batter, which stops the surface from puffing and collapsing.
Is it true these muffins require 375°F?
False. Bake them at 325°F (160°C) to ensure a creamy texture and avoid over-browning.
What ingredients make up the filling?
The filling contains softened cream cheese, granulated sugar, pumpkin puree, eggs, vanilla, pumpkin pie spice, and salt. If you enjoy these autumn flavors, try our pumpkin chocolate chip muffins.
Which technique prevents the crust from crumbling?
Spoon the mixture into cups and press firmly. Use a small glass or measuring spoon to pack the crumbs tightly against the bottom and sides before the 5-minute pre-bake.
Do these need to be chilled?
Yes, chill them for 2 hours. This cooling period allows the fats in the cream cheese to set, creating the proper cheesecake consistency.
Is the belief that low-fat cream cheese is superior a fact?
That's a myth. Full-fat cream cheese provides the richest flavor and the most stable structure for these small bites.
Mini Pumpkin Cheesecake Muffins: Creamy