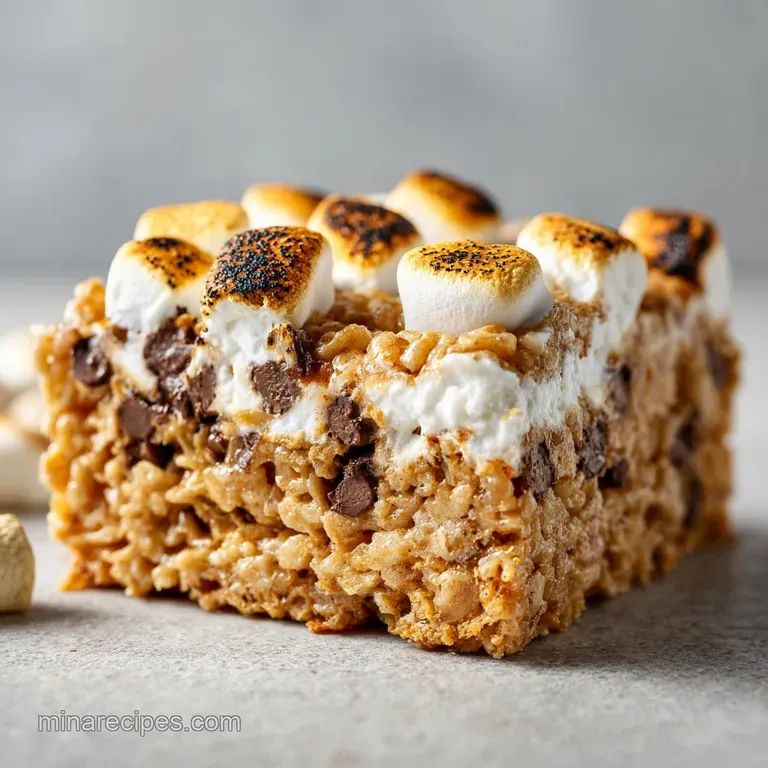
S'mores Rice Krispies Treat with Toasted Marshmallows
- Time:15 minutes active + 10 minutes cook + 45 minutes resting = 70 minutes total
- Flavor/Texture Hook: Smoky, charred sugar sweetness with a crispy cereal shatter
- Perfect for: Backyard cookouts, rainy day comfort, or bake sale "wow" factors
- Key Techniques Explained
- Essential Recipe Specifications
- Selecting high-quality Components
- Tools for a Mess Free Kitchen
- Following the Correct Cooking Order
- Common Pitfalls and Expert Solutions
- Swapping Flavors and Textures
- Keeping Your Treats Fresh Longer
- Three Ways to Plate Desserts
- Recipe FAQs
- 📝 Recipe Card
Key Techniques Explained
Getting that specific, chewy texture in a s'mores krispie treat isn't just luck; it is about how we handle the sugar and the heat. Most people rush the melting process, which turns the sugar into a hard, tooth breaking block once it cools. By keeping the heat low and slow, we maintain the marshmallow's integrity.
- Controlled Crystallization: Low heat prevents the sugar in the marshmallows from reaching the "hard crack" stage, keeping your bars soft for days.
- Staged Integration: Adding the cereal and graham crackers in steps ensures every piece is coated without crushing the delicate air bubbles.
- Thermal Buffering: The butter creates a thin fat barrier around the cereal, which stops the moisture in the marshmallows from making the rice soggy.
- Carbonized Depth: Broiling the jumbo marshmallows introduces carbon and bitterness, which balances the overwhelming sweetness of the milk chocolate.
| Feature | Fast Microwave Method | Classic Stovetop (This Recipe) | Texture Result |
|---|---|---|---|
| Cook Method | High heat bursts | Low stovetop melt | Classic is significantly softer |
| Marshmallow Prep | Raw/Melted | Broiled/Toasted | Classic adds deep smoky notes |
| Mix ins | Combined at once | Layered in stages | Classic keeps chocolate chunks intact |
The reason we use a two step marshmallow process is rooted in how the proteins behave. When you toast the jumbo marshmallows, you are creating a skin of caramelized sugar. When these are folded into the mix at the end, they don't fully dissolve.
This gives you "pockets" of intense campfire flavor rather than just a uniform sweetness throughout the whole bar.
Essential Recipe Specifications
Before we start melting butter, we need to look at the components that make up the structure of these treats. Using high-quality unsalted butter is non negotiable because it allows us to control the salt levels ourselves. We want that sea salt to pop against the chocolate, not just have a generic salty background.
| Ingredient | Science Role | Pro Secret |
|---|---|---|
| Unsalted Butter | Fat & Emulsifier | Use 1 tbsp extra for a "wetter," fudgier treat |
| Mini Marshmallows | The Structural Glue | Only use fresh bags; old ones won't melt smoothly |
| Rice Cereal | The Structural Base | Use a name brand for the most reliable "shatter" |
| Sea Salt | Flavor Contrast | Large flakes provide "bursts" that break the sugar wall |
The sea salt is doing heavy lifting here. Sugar on its own is one dimensional. Salt acts as a flavor magnifier, making the chocolate taste more "chocolaty" and the vanilla more aromatic. It’s the difference between a kid’s snack and a dessert that adults will fight over.
Selecting high-quality Components
For this S'mores Rice Krispies Treat with Toasted Marshmallows, your choice of chocolate matters. While we use milk chocolate to stay true to the campfire tradition, a high-quality bar that snaps when you break it will provide much better texture than cheap compound chocolate.
- 6 cups Crisp Rice Cereal Why this? Provides the foundational crunch and airy structure.
- 10 oz Mini Marshmallows Why this? Smaller surface area means they melt quickly and evenly.
- 6 tbsp Unsalted Butter Why this? Provides the fat needed to keep the bars moist and chewy.
- 1 tsp Vanilla Extract Why this? Rounds out the sweetness with a floral, aromatic finish.
- 1/2 tsp Sea Salt Why this? Vital for balancing the sugar and enhancing the chocolate.
- 2 cups Graham Crackers, roughly chopped Why this? Adds a rustic, wheaty crunch that defines the s'mores flavor.
- 8 oz Milk Chocolate Bars, broken into squares Why this? Traditional s'mores use milk chocolate for that velvety melt.
- 2 cups Jumbo Marshmallows Why this? These are for the broiler to get that smoky, charred exterior.
Chef's Tip: Freeze your milk chocolate bars for 10 minutes before breaking them into squares. This prevents them from melting instantly from the heat of your hands or the warm cereal mixture, ensuring you get those distinct chocolate chunks in every bite.
For a variation on the classic, you could swap the milk chocolate for dark chocolate to cut the sweetness even further. If you're looking for a quick weeknight side for your main meal before diving into these treats, check out my creamy Yukon Gold mashed potatoes.
Tools for a Mess Free Kitchen
You don't need a professional pastry kitchen to make these, but a few specific tools will make the cleanup much less of a nightmare. Marshmallow fluff is basically nature's superglue, so preparation is your best friend here.
- 9x9 inch Square Baking Pan: This size gives you the perfect thickness (about 1.5 to 2 inches).
- Large Non Stick Pot: Essential for the marshmallow melt; a standard stainless steel pot will lead to a lot of scrubbing later.
- Silicone Spatula: Spray this with non stick cooking spray or rub it with a little butter. Trust me.
- Parchment Paper: Do not just grease the pan. Use parchment with an overhang so you can lift the entire block out for easy slicing.
- Kitchen Torch or Oven Broiler: For that signature charred marshmallow look and taste.
Following the Correct Cooking Order
- Line your 9x9 inch pan with parchment paper, leaving a bit of overhang on the sides.
- Spread the jumbo marshmallows on a baking sheet. Broil them for 60 to 90 seconds until charred and golden brown. Watch them like a hawk!
- In your large non stick pot over low heat, melt the unsalted butter until it begins foaming and smelling slightly nutty.
- Add the mini marshmallows and sea salt to the butter. Stir constantly until they are about 80% melted. Small lumps are fine; they add texture.
- Pull the pot off the heat immediately and stir in the vanilla extract.
- Fold in the crisp rice cereal and half of the chopped graham crackers until every piece looks glossy and coated.
- Now, gently add the toasted jumbo marshmallows and the milk chocolate squares.
- Fold the mixture only 2 or 3 times. You want the chocolate to stay in chunks, not melt and turn the whole thing brown.
- Transfer the sticky mass to your prepared pan. Use a piece of buttered parchment to lightly pat it down. Do not press hard or you will end up with bricks.
- Sprinkle the rest of the graham crackers on top. Let the pan rest for 45 minutes at room temperature until the chocolate has set and the bars are firm.
Common Pitfalls and Expert Solutions
The most common mistake people make with any rice krispie variation is the "heavy hand." If you compress the mixture into the pan like you're trying to pack a suitcase, the treats will be rock hard. You want to gently guide them into the corners.
Fixing Hardened Texture Issues
If your treats turned out too hard, it's almost always because the marshmallows were overheated. When sugar gets too hot, it loses its moisture and becomes brittle. To prevent this, always pull the pot off the heat while there are still a few small marshmallow shapes visible.
The residual heat will finish the job without overcooking the sugar.
| Problem | Root Cause | Solution |
|---|---|---|
| Bars are rock hard | Overheated sugar or over compressed in pan | Use low heat; pat into pan with a very light touch |
| Chocolate is all melted | Added to the pot while mixture was too hot | Wait 60 seconds after adding cereal before adding chocolate |
| Treats are soggy | Used old cereal or too much butter | Always use a fresh box of cereal; measure butter exactly |
Mistakes to Avoid Checklist
Swapping Flavors and Textures
While the classic S'mores Rice Krispies Treat with Toasted Marshmallows is a masterpiece of simplicity, you can certainly play around with the elements. The "s'more" is a concept, not a rigid law.
If you want to go big, try a Salted Dark Twist. Swap the milk chocolate squares for a 70% dark chocolate bar and double the sea salt. The bitterness of the dark chocolate paired with the charred marshmallows creates a very sophisticated flavor profile that isn't cloying.
For those who love a bit of creaminess, adding a tablespoon of peanut butter to the melting marshmallows creates a "Peanut Butter Campfire" version that is incredibly rich.
If you are cooking for a crowd, you can easily double this recipe. Just be aware that you will need a very large pot. When doubling, don't double the salt or vanilla exactly; use about 1.5 times the amount to keep the flavors balanced. For another comforting dessert that uses simple pantry staples, you might enjoy my other Rice Crispy Treats Desserts ideas, though that link actually leads to my favorite savory side! (Actually, keep it to sweets if you want another cereal based treat, consider adding a handful of pretzels for a salty sweet crunch).
Keeping Your Treats Fresh Longer
Storage is where most people fail. Because these treats have so much exposed surface area, they go stale quickly if left on the counter. Always keep them in an airtight container. At room temperature, they will stay perfectly chewy for about 3 days.
If you find yourself with leftovers that have gone a bit firm, don't throw them away. You can chop them up and use them as a "Zero Waste" topping for vanilla bean ice cream. The cold ice cream softens the marshmallow slightly, and the crunch of the cereal is a great contrast.
I’ve even seen people pulse the stale leftovers in a food processor and use them as a "crust" for a chocolate cheesecake. It is uncomplicated and saves you from wasting those high-quality ingredients.
You can freeze these, but it's not ideal. If you must, wrap individual bars in plastic wrap and then put them in a freezer bag. They will last for 2 months. Just make sure to let them come completely to room temperature before eating, or you'll miss out on that signature marshmallow pull.
Three Ways to Plate Desserts
Even a rustic treat can look impressive with a few small tweaks. Whether you're just eating them over the sink (my personal favorite) or serving them at a dinner party, here is how to level up the presentation.
The Simple Approach
Cut the treats into large, uneven squares. Pile them high on a wooden cutting board or a simple white platter. This emphasizes the "homemade" and rustic nature of the dish. It tells your guests that these are flavor first and unpretentious.
The Polished Look
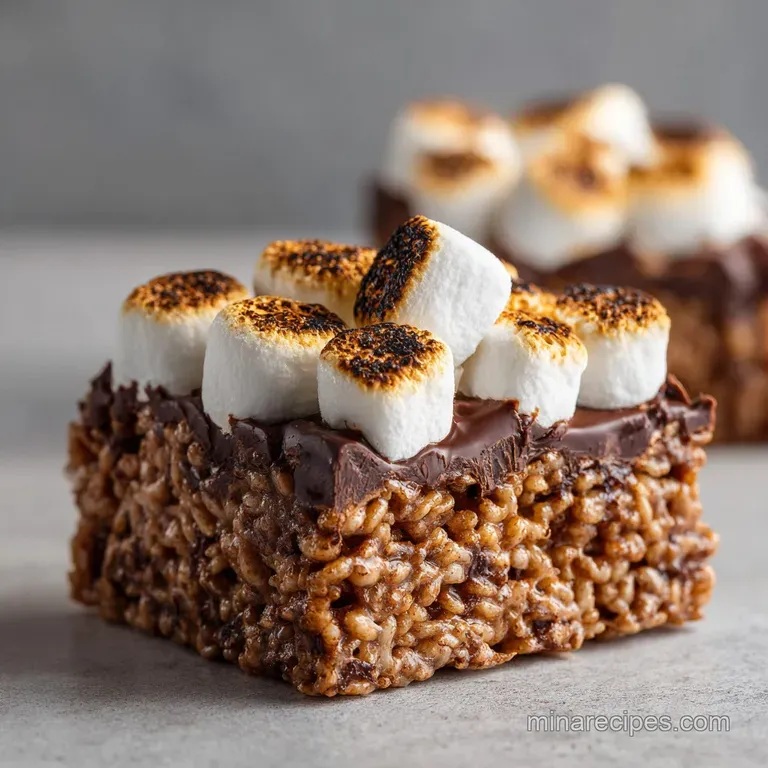
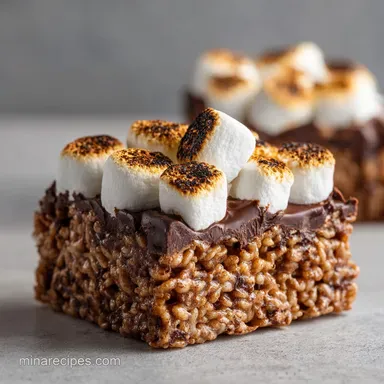
Cut the bars into perfectly even 2 inch squares using a ruler. Drizzle the tops with a little bit of melted chocolate and a tiny pinch of extra sea salt. This makes them look like something you’d find in a high end bakery without requiring any extra specialized equipment.
The Restaurant Style
Place a single square in the center of a small plate. Use a kitchen torch to re toast the top just before serving so the jumbo marshmallows are slightly warm and gooey. Serve with a small dollop of whipped cream on the side. This creates a temperature contrast that feels very professional.
| Plating Level | Main Element | Finishing Touch | Vibe |
|---|---|---|---|
| Simple | Rough squares | Wooden board | Rustic & Cozy |
| Polished | Even cuts | Chocolate drizzle | Bakery style |
| Restaurant | Individual plate | Warm torching | Impressive & Fussy |
The beauty of the S'mores Rice Krispies Treat with Toasted Marshmallows is that it doesn't need to be perfect to be delicious. In fact, the more "messed up" and chunky they look, the more people seem to want to grab one.
It's a celebration of sticky fingers and charred sugar, and honestly, that’s exactly how a dessert should be.

Recipe FAQs
Is it true I must melt my marshmallows on high heat to save time?
No, this is a common misconception. Using low heat is essential to prevent the marshmallow sugar from reaching the hard crack stage, which would otherwise result in tough, tooth breaking bars.
How to achieve the perfect charred flavor on the jumbo marshmallows?
Broil the jumbo marshmallows on a baking sheet for 60-90 seconds. Watch them closely to ensure they turn golden and charred, providing that authentic campfire bitterness to balance the sweetness.
How to prevent the cereal from becoming soggy?
Melt your unsalted butter until foaming and stir continuously. The butter creates a critical fat barrier around the rice cereal, which protects the texture from the moisture in the marshmallow mixture.
Is it necessary to wait the full 45 minutes before slicing?
Yes, the rest period is required for the structure to set. Attempting to slice the bars while they are still warm will cause them to pull apart and lose their shape.
How to fold in the chocolate and toasted marshmallows without melting them?
Use only 2-3 gentle folds after removing the pot from the heat. Limiting your movement ensures the milk chocolate squares remain as distinct chunks rather than blending entirely into the marshmallow base.
Can I compress the mixture firmly into the pan to make the bars denser?
No, avoid compressing the mixture. Use buttered parchment to lightly pat the mixture into the edges so you preserve the delicate air bubbles that keep the treat light and chewy.
How to store these treats to keep them fresh?
Keep them in an airtight container at room temperature. This method effectively prevents the rice cereal from going stale and maintains the intended texture for up to 24 hours.
Toasted Smores Rice Krispies
Ingredients:
Instructions:
Nutrition Facts:
| Calories | 372 kcal |
|---|---|
| Protein | 4.1 g |
| Fat | 13.5 g |
| Carbs | 61.3 g |
| Fiber | 1.1 g |
| Sugar | 40.4 g |
| Sodium | 248 mg |
