Lunch Lady Peanut Butter Bars
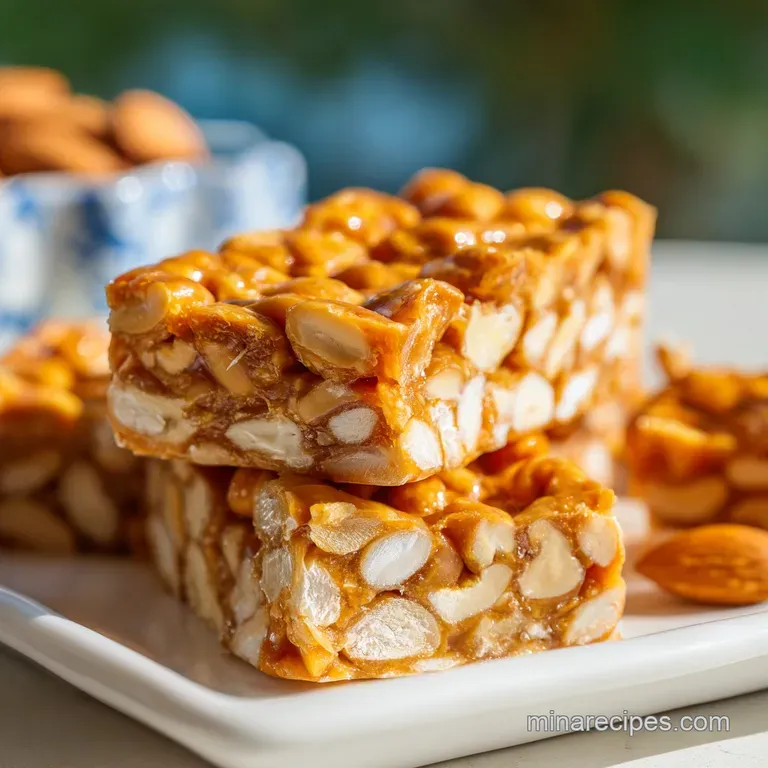
This nostalgic treat combines a salty sweet graham cracker base with a velvety chocolate glaze that won't crack when you bite into it. It is the definitive version of the classic school cafeteria square, reimagined for a home kitchen with better ingredients.
- Time:15 minutes active + 1 hours 5 mins chilling = 1 hours 20 mins total
- Flavor/Texture Hook: Dense, fudgy peanut butter fudge with a snappy chocolate finish
- Perfect for: Potlucks, school bake sales, or late night snack cravings
Make-ahead: Prepare the base and glaze up to 3 days in advance; keep refrigerated until serving.
Bringing Back the Cafeteria Classic Lunch Lady Peanut Butter Bars
There is a very specific smell that takes me straight back to my 4th-grade cafeteria. It’s not the smell of mystery meat or overboiled green beans. No, it’s that heavy, sweet, intoxicating aroma of peanut butter and melted butter wafting from those giant rectangular aluminum sheets. You know the ones.
The lunch ladies would slice them into massive, thick squares that were almost impossible to finish but we did it anyway.
I remember watching Mrs. Gable, our lead cook, pressing the base into the pans with a speed that felt like a superpower. She didn't use fancy tools; she used a heavy metal spoon and sheer muscle. Those bars were the highlight of the month.
They were salty enough to make you thirsty and sweet enough to give you a rush that lasted through afternoon recess. When I tried to recreate them at home, I realized the secret wasn't some hidden chemical it was the ratio of fat to sugar and the specific way the peanut butter holds everything together.
For this recipe, we are putting the spotlight on the creamy peanut butter. It is the structural engineer of this entire operation. While I love a "natural" jar where the oil sits on top for my morning toast, it has absolutely no place here. You need the stabilized, silky, commercial stuff.
The stabilizers in brands like Jif or Skippy are what keep these bars from turning into a greasy puddle on your counter. They provide that specific, uniform texture that melts on your tongue but stays firm in your hand.
This is rustic, uncomplicated soul food that doesn't need a garnish to be the best thing on the table.
The Secret to Success
We often think of no bake desserts as "simple," but there is actually quite a bit of interesting physics happening in that bowl. It’s all about creating a suspension where the sugar doesn't feel gritty and the fat doesn't leak out.
- Fat Stabilization: The emulsifiers in commercial creamy peanut butter prevent the oils from separating when mixed with melted butter.
- Structural Integrity: Compressing the graham cracker crumbs with a flat tool creates a dense matrix that holds up under the weight of the chocolate.
- Moisture Control: Sifting the powdered sugar ensures it hydrates instantly in the butter, preventing a chalky or sandy mouthfeel.
- Thermal Tempering: Adding a small amount of peanut butter to the chocolate chips lowers the melting point, making the topping "softer" so it doesn't shatter when sliced.
| Method | Prep Time | Resulting Texture | Best For |
|---|---|---|---|
| Stovetop Melting | 8 minutes | Ultra smooth, controlled heat | Precision and gloss |
| Microwave Melting | 3 minutes | Quick, slight risk of hotspots | Fast track cravings |
| Oven Warming | 15 minutes | Slow, indirect heat | Bulk prep only |
Using the stovetop method gives you a bit more control over the chocolate. If you’ve ever had chocolate seize on you, you know the heartbreak of a grainy topping. Gentle heat is your best friend when you’re aiming for that "lunch lady" velvet finish.
Component Analysis and Selection
Understanding your ingredients is the difference between a bar that crumbles and one that stays together. We are looking for specific textures here, not just flavors.
| Ingredient | Science Role | Pro Secret |
|---|---|---|
| Salted Butter (225g) | Primary binder and flavor carrier | Melt it until just liquid, don't let it brown or boil. |
| Graham Crumbs (200g) | Provides the "rebar" for the structure | Use a food processor for a fine, sand like consistency. |
| Powdered Sugar (240g) | Sweetener and structural filler | Always sift to remove clumps that won't dissolve in cold fat. |
| Creamy Peanut Butter | Emulsifier and primary flavor | Use standard commercial brands for the best stability. |
The butter needs to be melted but not piping hot. If it's too hot, it can actually cause the sugar to melt further than we want, leading to a greasy finish. If it's just barely melted, it stays "creamy" as it incorporates with the peanut butter.
Ingredients
To get the perfect batch of lunch lady peanut butter bars, you need these exact components. Don't skip the sifting; it’s the most important part for the texture.
- 1 cup (225g) Salted butter, meltedWhy this? Provides the richness and acts as the glue for the crumbs.
- 2 cups (200g) Graham cracker crumbsWhy this? The toasted honey flavor perfectly balances the salty peanut butter.
- 2 cups (240g) Powdered sugar, siftedWhy this? Adds sweetness without the crunch of granulated sugar.
- 1.5 cups (380g) Creamy peanut butterWhy this? The high oil to protein ratio ensures a fudgy, not dry, base.
- 0.5 tsp Sea saltWhy this? Cuts through the sugar and makes the peanut flavor pop.
- 1.5 cups (255g) Semi sweet chocolate chipsWhy this? Provides a bold contrast to the sweet base.
- 0.25 cup (65g) Creamy peanut butter (for glaze)Why this? Keeps the chocolate flexible so it won't crack when bitten.
| Original Ingredient | Substitute | Why It Works |
|---|---|---|
| Graham Cracker Crumbs | Digestive Biscuit Crumbs | Similar density and sweetness; very common in UK/Europe. |
| Salted Butter | Unsalted Butter + 1/4 tsp salt | Gives you total control over the sodium levels. |
| Semi sweet Chocolate | Dark Chocolate (60% cacao) | Provides a more bitter, "grown up" flavor profile. |
| Powdered Sugar | Coconut Sugar (blitzed fine) | Adds a caramel note, though it will be slightly grittier. |
If you find yourself short on graham crackers, you could even use crushed vanilla wafers. The vibe changes slightly, but the structural science remains the same. Just ensure the crumbs are fine enough to pack down tightly.
Equipment Needed
You don't need a professional kitchen, but a few specific items make this much easier. I always suggest a 9x13-inch (23x33cm) baking pan. If you use a smaller pan, the bars will be too thick and honestly, a bit overwhelming.
The most important "tool" is actually a flat bottomed measuring cup. It allows you to apply even pressure across the base. If you use your hands, the heat from your palms can soften the butter, making the base uneven. A sturdy whisk and a heat proof bowl for the chocolate are also essentials.
If you're feeling fancy, an offset spatula is the best way to get that perfectly flat, mirror like chocolate top.
How to Make It

This is a straightforward process, but the order of operations matters. We want to build layers that feel distinct but don't separate when you lift a square out of the pan.
1. Prepare the Foundation
Line your 9x13-inch pan with parchment paper. Make sure the paper hangs over the long sides. This "sling" is how you'll lift the whole block out later. If you skip this, the first bar will always be a sacrificial crumbly mess.
2. Mix the Base
In a large mixing bowl, combine 225g of melted salted butter, 200g of graham cracker crumbs, and 240g of sifted powdered sugar. Stir in 1.5 cups (380g) of creamy peanut butter and 0.5 tsp of sea salt. Stir until the mixture is uniform and thick.
You shouldn't see any streaks of white sugar or dry crumbs.
3. The Compression Phase
Transfer the peanut butter mixture to the prepared pan. Using the bottom of a flat measuring cup, press the mixture firmly into the corners. You are aiming for a solid, level surface. Note: This compression is what prevents the bars from falling apart when you eat them.
4. Melt the Chocolate Crown
In a microwave safe bowl, combine 255g of semi sweet chocolate chips with the remaining 1/4 cup (65g) of peanut butter. Microwave in 30 second bursts, whisking in between. Stop when it's glossy and smooth. Overheating chocolate makes it dull and thick.
5. The Glazing Step
Pour the chocolate glaze over the peanut butter base. Use an offset spatula or the back of a spoon to spread it evenly to the edges. Give the pan a gentle tap on the counter to release any air bubbles and help the chocolate level out.
6. The Setting Stage
Refrigerate the bars for at least 1 hour. You are waiting until the chocolate is set and the base feels firm to the touch. If you try to cut them too early, the chocolate will smear.
7. Slicing the Bars
Lift the bars out of the pan using the parchment paper overhang. Use a sharp, warm knife to slice them into 24 squares. Wipe the knife between every single cut for those clean, "lunch lady" edges.
Troubleshooting Guide
Even with a no bake recipe, things can go sideways. Usually, it's a matter of temperature or moisture.
Why Your Base is Crumbly
If your bars fall apart the moment you pick them up, the culprit is usually the compression or the butter ratio. If the graham crumbs weren't fine enough, they won't bond properly.
Why the Chocolate Seized
If your chocolate turned into a thick, gritty paste instead of a silky glaze, you likely got a drop of water in the bowl or overheated it. Chocolate is temperamental; it hates moisture and high heat.
| Problem | Root Cause | Solution |
|---|---|---|
| Greasy surface | Butter was too hot when mixing | Blot with a paper towel and chill immediately. |
| Chocolate cracking | No fat added to the topping | Always mix peanut butter or a teaspoon of oil into the chips. |
| Grainy texture | Powdered sugar wasn't sifted | Next time, use a fine mesh sieve for the sugar. |
Common Mistakes Checklist:
- ✓ Didn't sift the powdered sugar (leads to white lumps).
- ✓ Used "natural" peanut butter (the bars won't set).
- ✓ Cut the bars while the chocolate was still room temp (smears everywhere).
- ✓ Forgot the parchment paper (bars get stuck in the pan).
- ✓ Overheated the chocolate (loses its shine).
Mix It Up
If you want to scale this recipe down for a small household, you can easily halve the ingredients and use an 8x8-inch pan. The cook time (melting) remains roughly the same, but the chilling might happen a bit faster.
For doubling the recipe, I recommend using two separate 9x13 pans rather than one giant one, as it's hard to get the base compressed evenly in a massive tray.
If you are looking for a different texture, you might want to try S'mores Rice Krispies Treat which uses a similar "press and set" method but with a much lighter, airier crunch.
| Servings | Pan Size | Butter Amount | PB Amount (Base) |
|---|---|---|---|
| 12 bars | 8x8 inch | 112g | 190g |
| 24 bars | 9x13 inch | 225g | 380g |
| 48 bars | Two 9x13 inch | 450g | 760g |
When scaling up, keep your spices and salt to about 1.5x the original amount rather than a strict double. Salt can become overwhelming very quickly in large batches of sweets.
Myths
One common misconception is that you need to bake the graham cracker base to make it stay together. In reality, the chilled butter and peanut butter act as a powerful adhesive. Baking would actually dry out the base and lose that fudgy "lunch lady" signature texture.
Another myth is that "low-fat" peanut butter works just as well. Please, don't do this to yourself. The fat is what allows the bars to set into a solid state in the fridge. Without it, you’ll be eating the bars with a spoon out of a bowl. It’s a dessert; embrace the fat!
Storage & Zero Waste
These bars are quite hardy. You can store them in an airtight container in the fridge for up to 1 week. If you leave them on the counter, they will soften significantly, especially in a warm kitchen. For long term storage, they freeze beautifully.
Wrap individual squares in plastic wrap and store them in a freezer bag for up to 3 months. You can even eat them straight from the freezer they have a texture like a dense candy bar.
To avoid waste, use any leftover graham cracker crumbs as a topping for yogurt or oatmeal. If you have extra chocolate glaze, dip some pretzels or apple slices in it. Nothing in this recipe should ever see the trash can!
Presentation Tips
While these were originally served on plastic trays, you can definitely make them look sophisticated.
- Simple: Serve a square on a plain white plate. The contrast of the dark chocolate and tan peanut butter is classic enough on its own.
- Polished: Use a hot knife to get perfectly sharp edges. Sprinkle a tiny pinch of flaky sea salt (like Maldon) over the chocolate before it sets. This highlights the "salty" part of the salty sweet equation.
- Restaurant: Place a square in the center of a plate. Add a small dollop of stable cream cheese frosting on the side and a few crushed roasted peanuts. A drizzle of salted caramel wouldn't hurt either.
| Level | Garnish | Plate Style |
|---|---|---|
| Simple | None | Wooden board or paper napkin |
| Polished | Flaky Sea Salt | Solid colored ceramic |
| Restaurant | Frosting + Crushed Nuts | Large rimmed white plate |
No matter how you serve them, the first bite will always take people back to that lunchroom. They are rustic, imperfect, and absolutely comforting. Enjoy the nostalgia!

Recipe FAQs
Why are they called lunch lady bars?
They earned the name because they were a staple dessert in American school cafeterias. Their simple, nostalgic flavor profile and crowd pleasing texture made them a classic menu item prepared by school lunch staff.
What makes lunch lady bars special?
The unique combination of a dense, buttery peanut butter base and a smooth, glossy chocolate top creates a perfect contrast. Because they are a no-bake recipe, they maintain a rich, fudge like consistency that is difficult to achieve with traditional baked goods.
What happened to peanut butter bars?
They haven't gone anywhere, but their popularity in schools has declined due to widespread peanut allergies. Many people still make them at home to recapture the nostalgic, comforting taste of the original cafeteria version.
Do lunch lady bars need to be refrigerated?
Yes, they should be stored in the refrigerator to maintain their structure. If left on the counter in a warm kitchen, the butter and peanut butter base will soften significantly and lose their firm, bar-like texture.
How to get perfectly clean slices when cutting the bars?
Run a sharp knife under hot water and wipe it dry before each cut. The heat will slice through the firm chocolate layer smoothly without cracking or dragging the glaze.
Is it true that these bars require baking to set the base?
No, this is a common misconception. This recipe is completely no-bake; simply press the base firmly into the pan and refrigerate for 1 hour until the fats solidify.
How to freeze lunch lady bars for later?
Wrap individual squares in plastic wrap and place them in a freezer bag for up to 3 months. You can eat them directly from the freezer for a texture similar to a dense, cold candy bar.
Lunch Lady Peanut Butter Bars
Ingredients:
Instructions:
Nutrition Facts:
| Calories | 325 kcal |
|---|---|
| Protein | 5.9 g |
| Fat | 21.8 g |
| Carbs | 29.4 g |
| Fiber | 1.8 g |
| Sugar | 20.1 g |
| Sodium | 262 mg |
